
How to Create, Build, and Release a Steam Demo
This article explains how independent game developers (and small indie teams) can create a demo for their game on Steam—covering the full process from setup through build and release.
For an overview of the complete process of selling a game on Steam, see the article below.
Note: these steps are based on my own registration experience between October and November 2025. Valve may update the process, so treat these as approximate guidance. For reference, here is the game I submitted to Steam:
https://twitter.com/FoxEngineer777/status/1974287906367050068
Background Knowledge Before Creating a Demo
Creating a demo involves four main steps:
- Create the demo app
- Set up the demo’s store page
- Build the demo (demo build)
- Release the demo
Steps 2 and 3 both require review from Steam, just like the full product.
Reviews can sometimes complete within a week, but two weeks is more common. In slow cases, three weeks to a month is possible. If you have a target release date for your demo, aim to have everything ready for review at least one month in advance.
Note that even if your demo isn’t fully polished, Steam allows you to submit for review as long as all required features are included. A practical approach is to complete the main events and core features first, submit for review, then add side content and supplementary features afterward—the same applies to the full product.
Creating the Demo App
Let’s get started creating the demo app. Demos are handled as a separate app (with their own App ID) from the main product—not as a modification of the existing app.
As mentioned in an earlier article, every new app requires a $100 deposit. However, demos and DLC created as separate apps tied to an existing product are exempt—they can be created for free.
You might think: “So I can register a second game as DLC and skip the deposit!” Steam’s terms explicitly prohibit this, so don’t try it.
Creating the Demo App
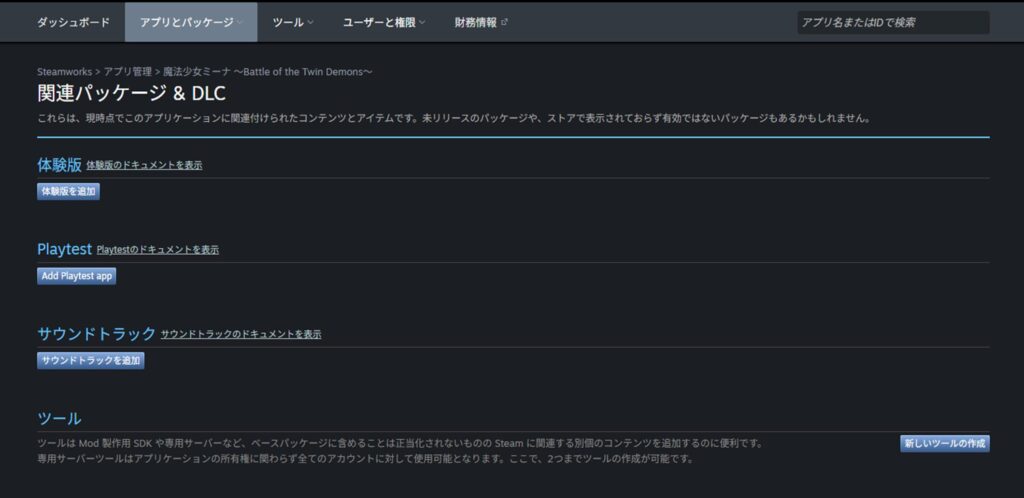
To create a demo app, go to the full game’s development page and click “View Associated Items” → “All Associated Packages, DLC, Demos, and Tools.”
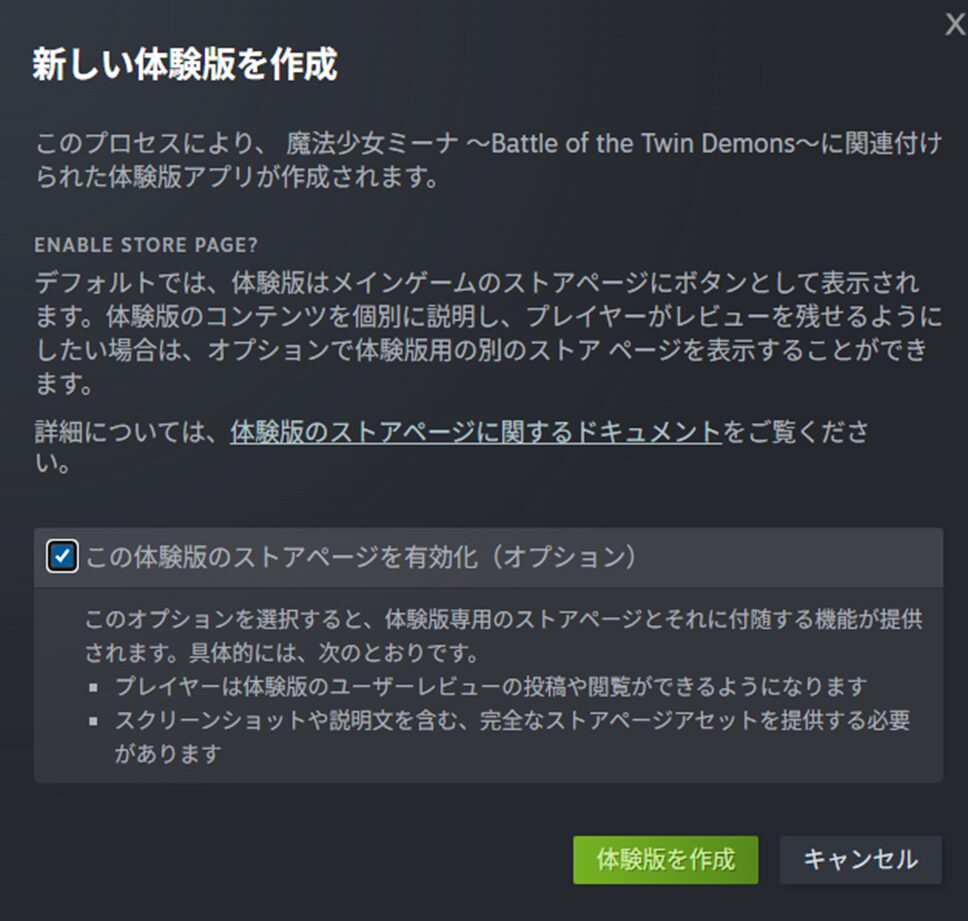
On the next screen, click the “Add Demo” button.
A checkbox prompt will appear with options for your demo. These can be changed later, so check the boxes and click “Create Demo.”
A dialog will confirm that a new app has been created.
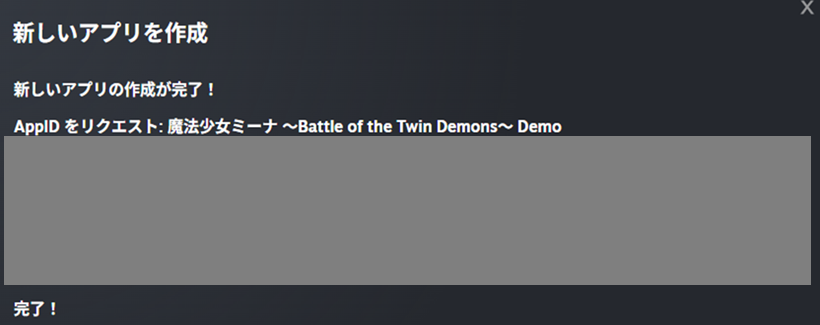
Returning to the previous page, you can confirm that the demo app has been successfully created. That’s all for the app creation step.

Creating the Demo Store Page
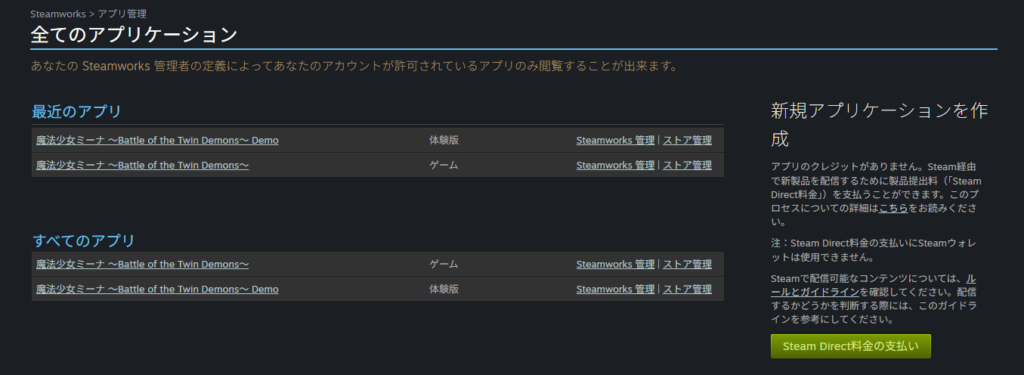
Next, open “Apps & Packages” → “All Applications.” You should see the demo app listed alongside the full product app.
This is because the demo is registered as its own app, just like the full product. Critically: all steps from this point forward apply to the demo app, not the full product app.
If you accidentally continue working on the full product app, it’s likely that Steam’s review will flag it as a demo submission and reject it—and submitting demo content to a production app is generally a bad idea.
Whenever you’re working on the demo, make sure to select the demo app (the one with “Demo” at the end of its name) in the app list.
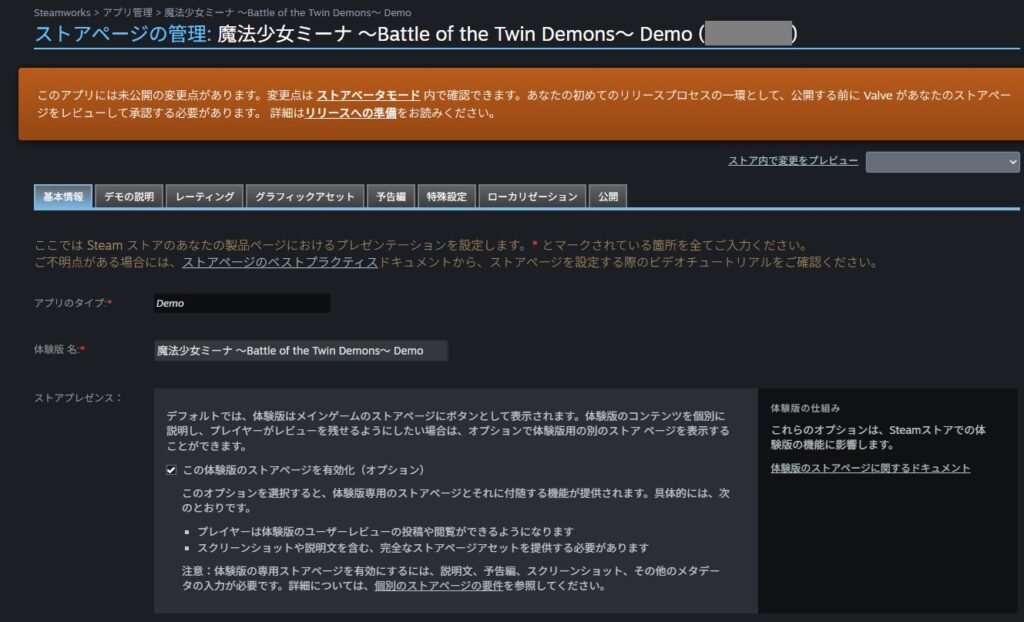
The Demo Requires Its Own Store Page—Just Like the Full Product
Clicking on the demo app in that list brings up an app management screen that looks nearly identical to the full product’s—with minor differences (e.g., “Game Build” becomes “Demo Build”). For the most part, treat it as the same.
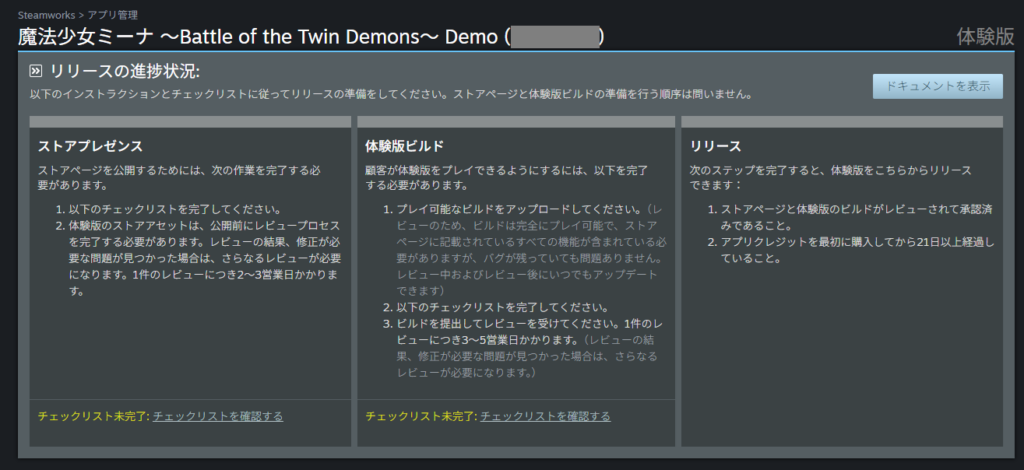
If you haven’t already guessed from this screen: yes. Steam requires you to go through the entire process—store page, build, and release—for the demo, just as you did for the full product.
Discouraging? Absolutely. Anyone who has already set up a full store page will feel this deeply. That said, Steam does offer some tools to reuse content from the full product, so the demo process is considerably less work than the original—but it still takes effort, and the first-time review requirement means it takes time. Plan accordingly.
Setting Up the Demo Store Page (Skipping Overlap with the Full Product)
Let’s build the demo store page. As with the full product, start by clicking “Store Page” under “Store Presence.”
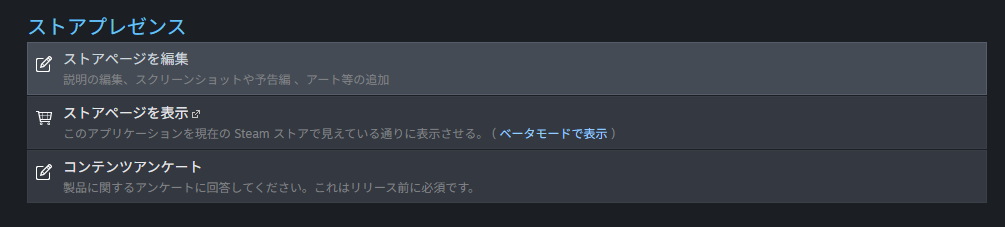
A slightly different prompt appears compared to the full product. The “Store Presence” section is essentially asking: “Would you like to allow individual reviews on the demo?” This is the same toggle you saw when creating the demo app, and it can be changed here.
Unchecking this reduces the amount of content you need to fill out. However, I chose to keep it checked—players who enjoy the demo should be able to leave a review.
If you’re publishing in English-speaking markets, leaving reviews enabled may be particularly worthwhile: overseas players tend to write reviews actively, and even a handful of positive impressions can help build trust before the full release.
That said, this setting is a double-edged sword.
Many well-known indie titles disable reviews on their demos—likely to avoid negative impressions before the full game launches. Steam discourages using the demo as a testing ground or treating players as beta testers (player feedback through dedicated testers is a separate matter).
There are legitimate reasons to release an unfinished demo—for example, to participate in a major event like Steam Next Fest—so consider your specific situation, weigh the pros and cons of allowing reviews, and decide accordingly.
For solo developers, recruiting dedicated testers is often impractical, so using demo reviews to gather feedback may simply be unavoidable.
For other store page fields, I’ll skip the parts that overlap with the full product setup. If you’re unsure about any field, refer to the previous store page article (linked below) or open your full product’s store page in another tab as a reference.
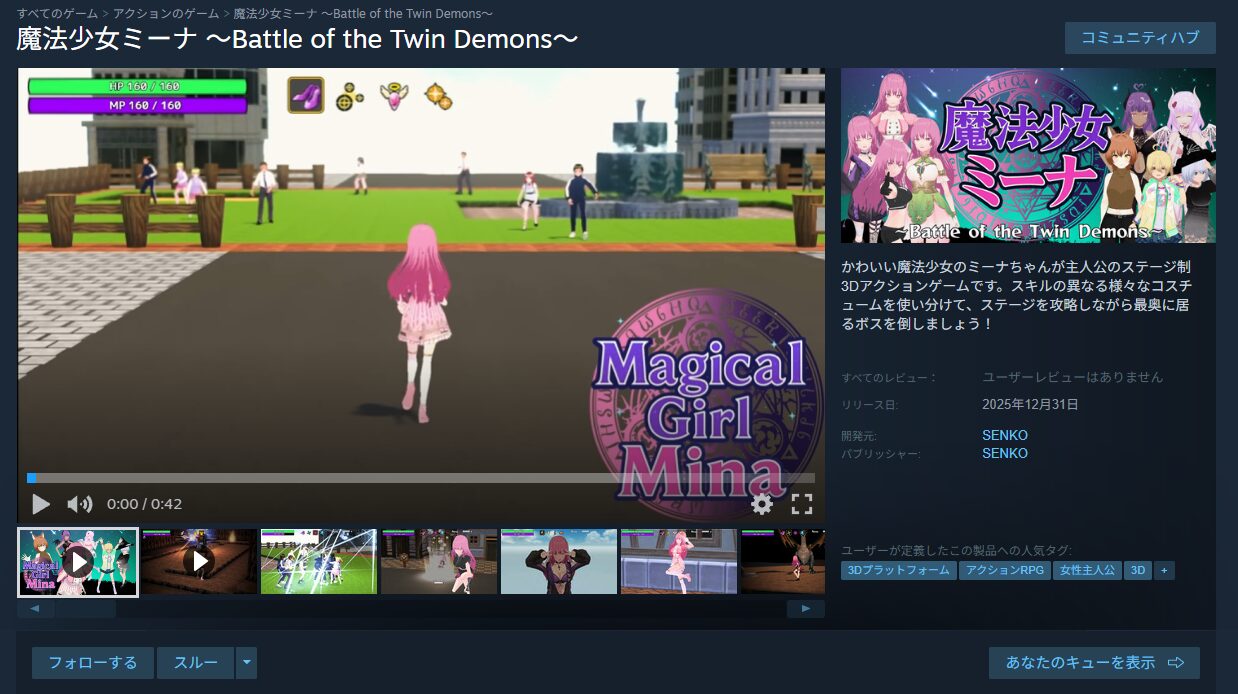
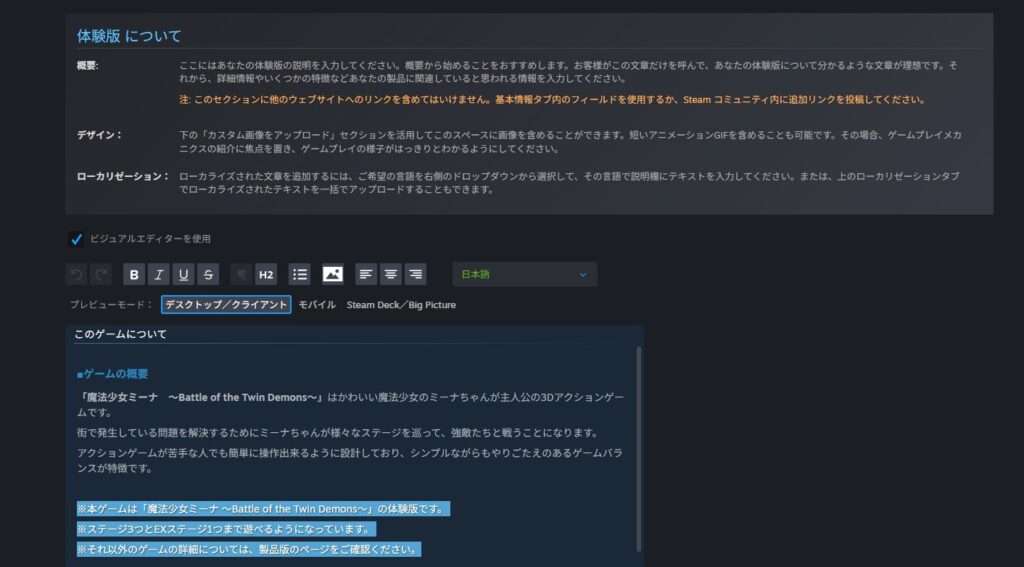
What follows are the parts that differ from the full product setup. First, the “Demo Description” tab—unlike the full product, this requires clearly explaining what players can do in the demo.
The easiest approach is to copy the full product’s description (images will need to be re-uploaded separately) and then add a clear section explaining what content is included in the demo.
The text displayed alongside the header capsule can be the same as the full product’s.
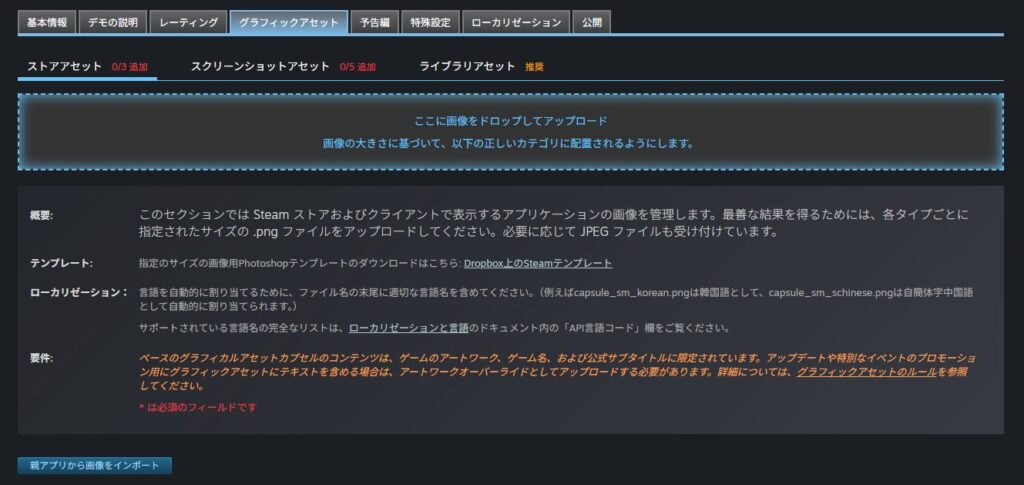
Under “Graphic Assets,” only “Store Assets” and “Screenshots” apply to the demo. For Store Assets, there’s an “Import Images from Parent App” button that pulls assets from the full product.
Screenshots, oddly, cannot be imported this way—re-upload the same images you used for the full product.
Note: the import function for Store Assets seems to only bring over English-language versions. To be safe, manually upload the same images used for the full product for each locale.
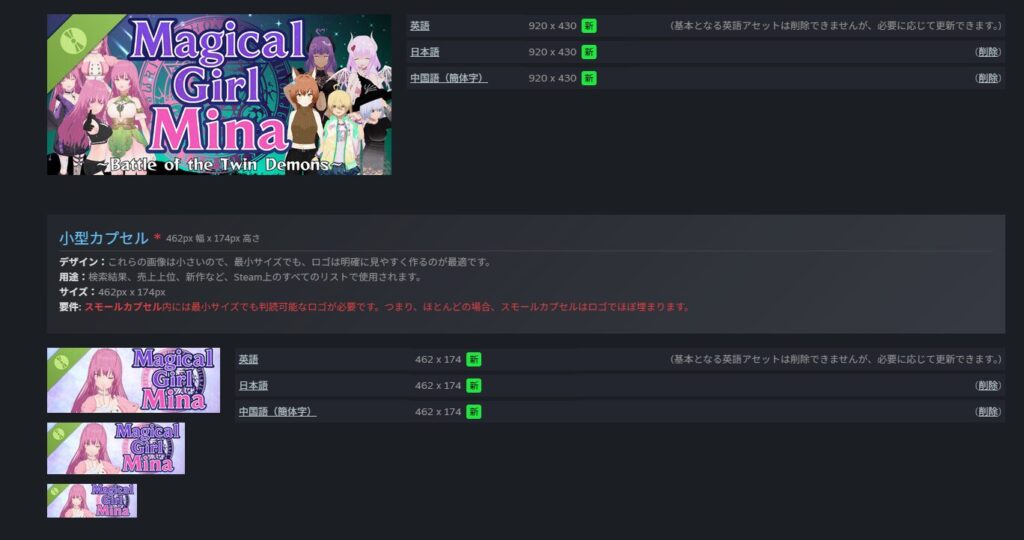
One important caveat about graphic assets: demo capsule images automatically receive a “Demo” badge overlay in the top-left corner. If you use the same capsule image as the full product, this badge may cover your game’s title logo.
Any text or logo that gets obscured—even partially—will be flagged during review. After uploading, check carefully that the title logo is fully visible.
I was flagged on this for the small capsule image—so I moved the logo position to the opposite side compared to the full product version.
https://twitter.com/FoxEngineer777/status/1979448040990871913
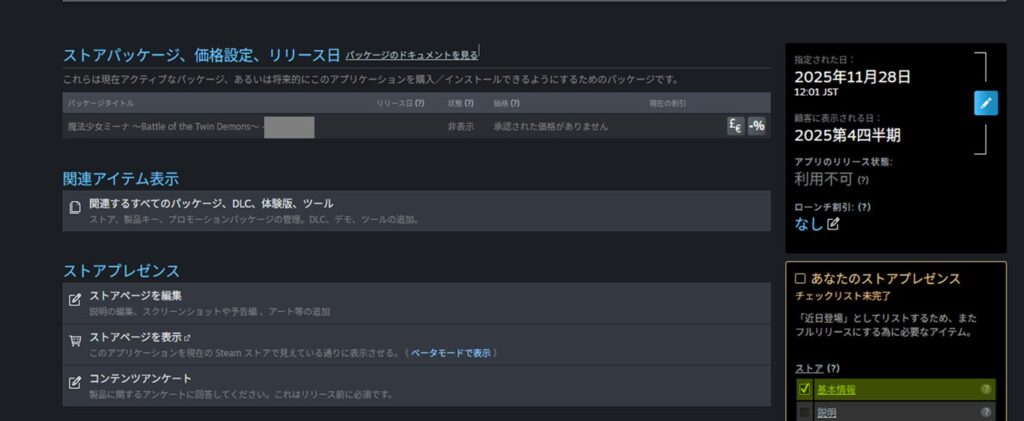
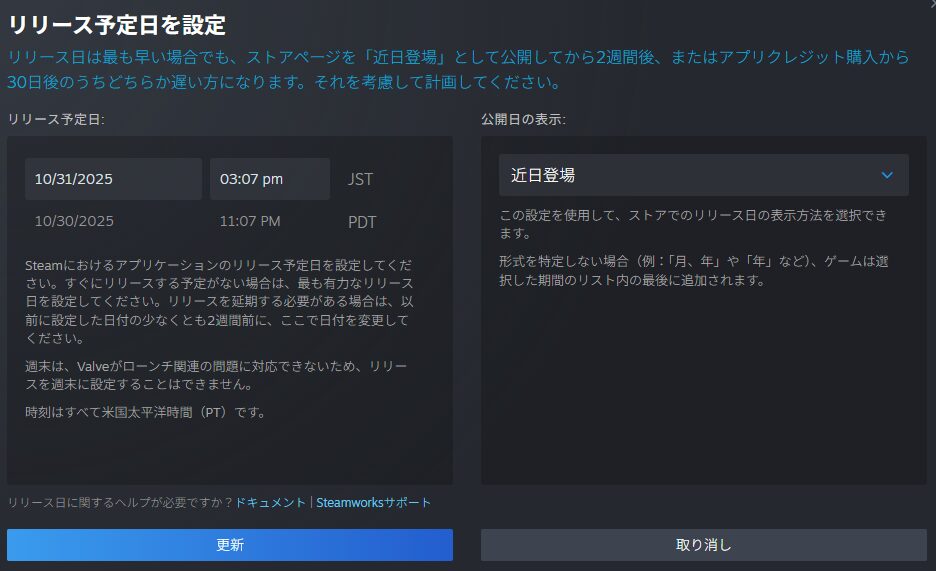
The demo also requires a release date, even though it’s not part of the store page itself—it appears on the right side of the app management page.

For the full product, setting a release date within two weeks of launch is discouraged because it locks the date. Demos appear to be more flexible in this regard, so it’s probably fine to set a date within two weeks.
I set mine about three weeks out just to be safe.
Also remember to configure the localized app name, just as you did for the full product.
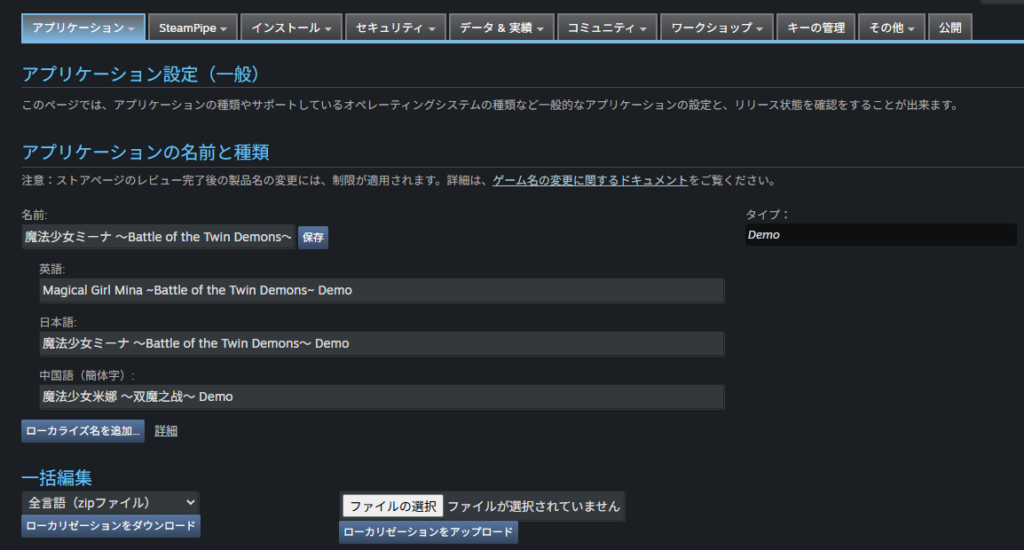
Submitting the Demo Store Page for Review
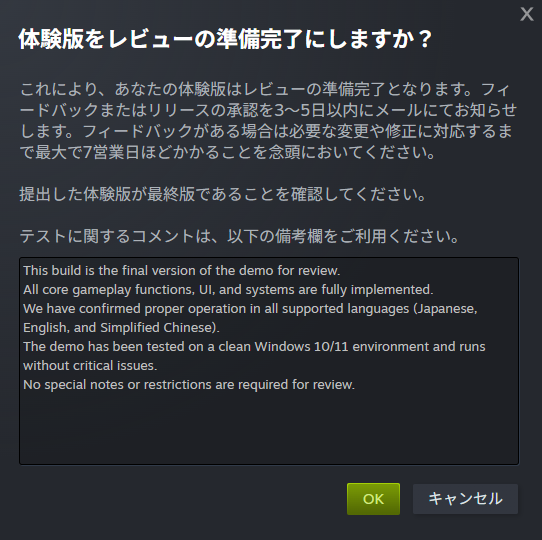
Once all fields are filled in, the “Ready for Review” button becomes available. Before submitting, verify the demo looks correct in beta mode—then click “Ready for Review.”
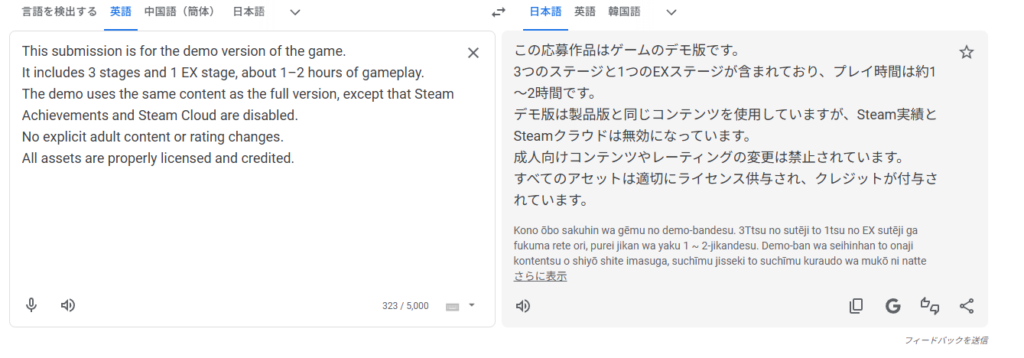
A notes field appears on the review submission screen. A brief explanation of how the demo differs from the full product is enough. Here’s what I wrote:
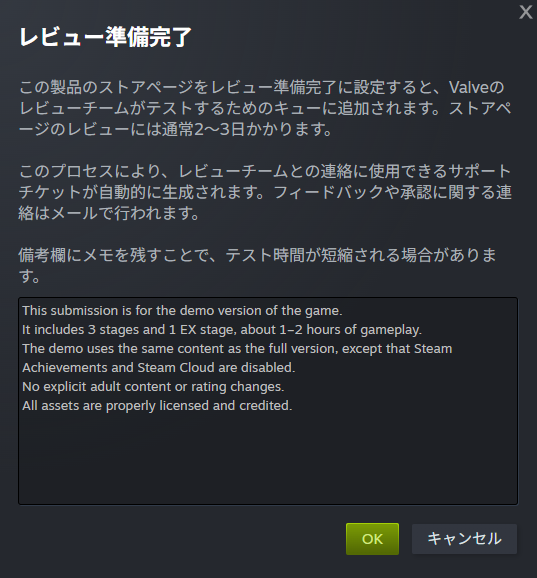
After confirming the content, click “OK” to submit for review.
Review completion notifications typically arrive within a few days. It’s a good idea to start work on the demo build while waiting. In my case, issues with the content questionnaire extended the process to over two weeks before passing.
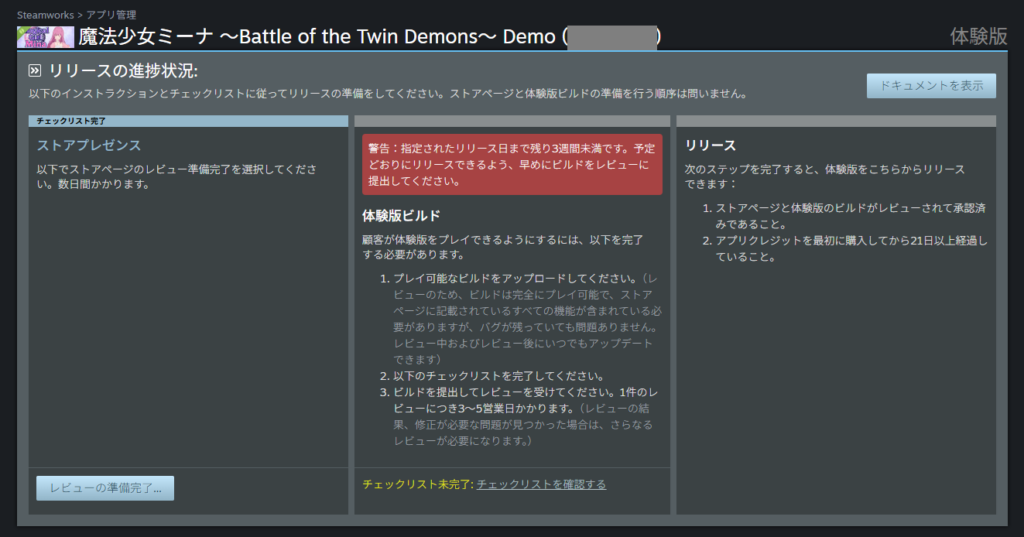
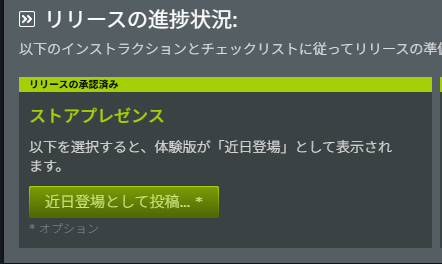
Once the store page review is approved, you’ll be able to publish it—but hold off for now. The standard practice for demos is to publish the store page at the same time as the release, after the build review is also approved.
That covers the demo store page. Now let’s move on to the demo build.
Demo Build Process
With the demo store page set up, it’s time to work on the demo build. (You can start this while the store page review is still in progress.)
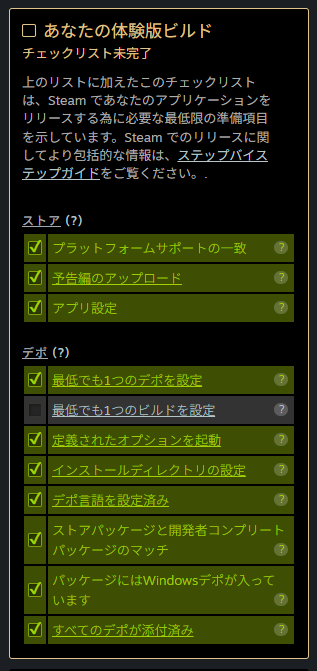
Open the demo app management page and check the build checklist on the right side of the screen. We’ll work through each item.
Build-related tasks involve specialized terminology that can be hard to grasp from the steps alone. I’ve written a separate article covering the terminology and the overall picture of how Steam builds work—refer to it if anything is unclear as you proceed.
Matching Platform Support
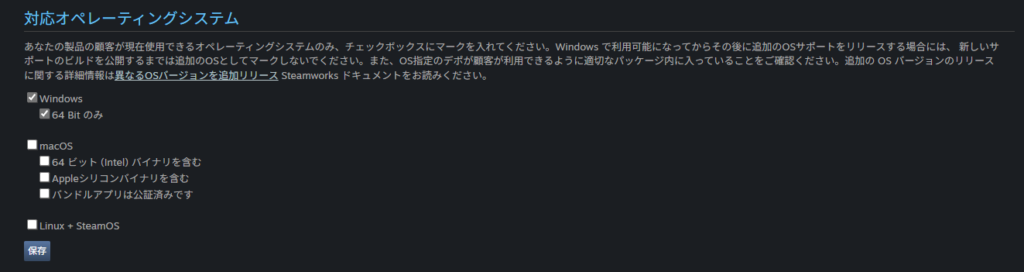
To clear “Platform Support,” go to the demo app management page and select “Technical Tools” → “Edit Steamworks Settings.”
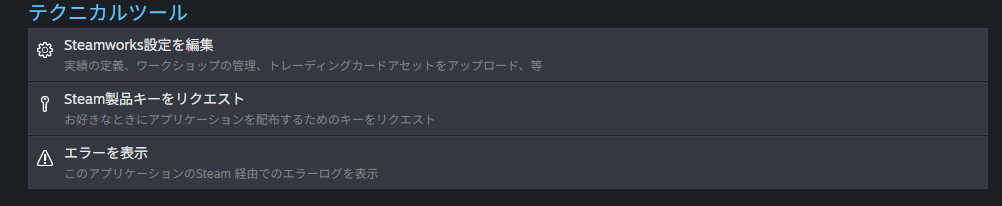
At the bottom of that page, set the “Supported Operating Systems” to match what you entered on the store page. That clears this checklist item.
Uploading a Trailer
For the trailer, use the same one from the full product’s store page. If you haven’t uploaded one yet, refer to the store page article for guidance.
https://en.senkohome.com/steam-registration-3/#toc13
Interestingly, a trailer wasn’t required when setting up the full product’s store page, but it is required for the demo build checklist. This may be intentional—large game releases often stagger their store page and demo releases, so perhaps the trailer requirement is relaxed on the store page to accommodate that.
App Configuration
Honestly, I couldn’t identify exactly what setting this referred to. It was automatically marked as complete after setting up the store page, and I expect the same will be true for others.
If it’s not checked off, investigate the individual settings—but it’s unlikely to cause significant issues.
Setting Up at Least One Depot
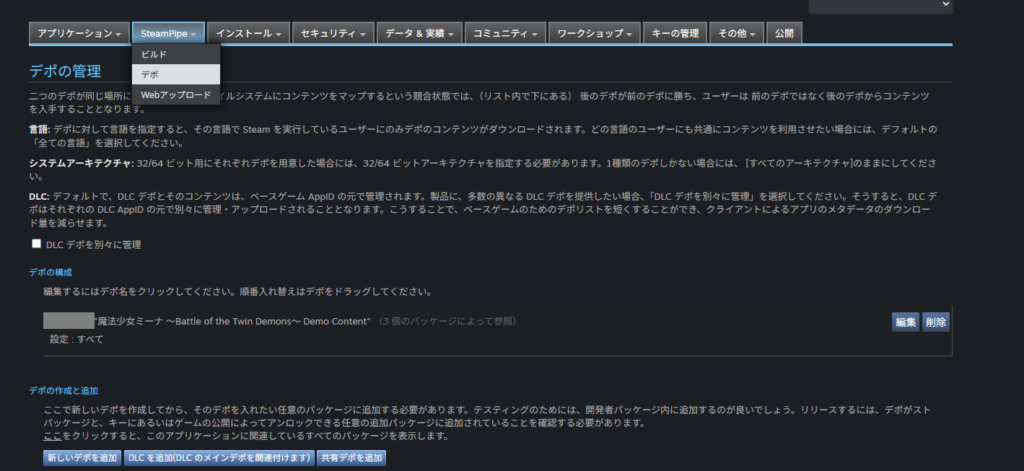
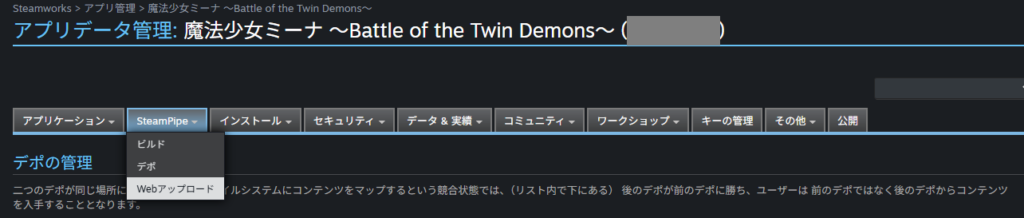
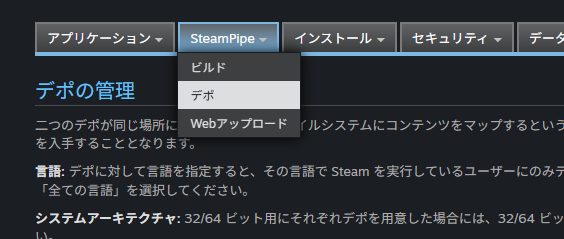
A depot is the storage location for the actual game files. Go to “Technical Tools” → “Edit Steamworks Settings” → “SteamPipe” → “Depots.”
A depot is created automatically when the app is created. Checking the depot screen for the demo app should show exactly one depot.
If you’ve accidentally deleted it, click “Create New Depot” to recreate it.
Setting Up at Least One Build
Builds in Steam are Steam’s version management system (see the separate terminology article for details).
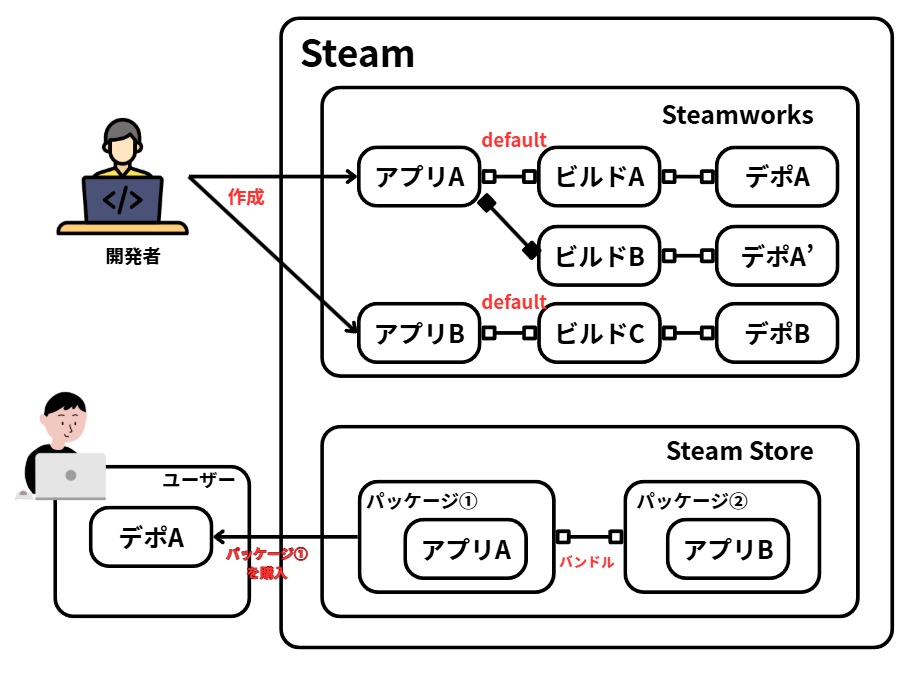
Concretely: when a developer uploads their game files to Steam, those files are stored in a “depot,” and the state of that depot is tracked using a version number called a “Build ID.”
There are two ways to upload game files to Steam: Web Upload and uploading via the Steamworks SDK.
Web Upload is simpler—you upload a ZIP file directly from the Steamworks interface. However, it only supports files up to 2 GB. Files larger than 2 GB require the Steamworks SDK method.
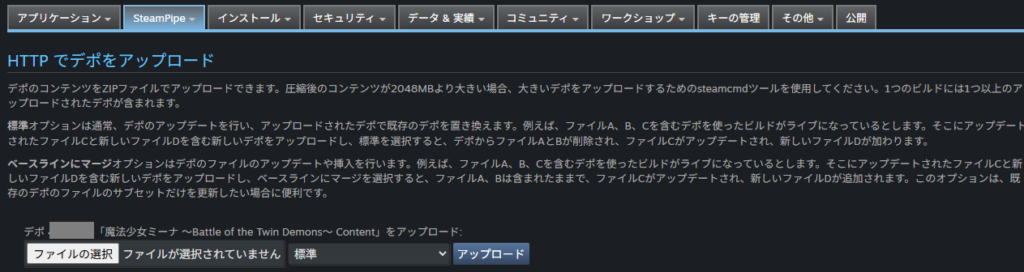
Web Upload (Up to 2 GB)
Go to “Technical Tools” → “Edit Steamworks Settings” → “SteamPipe” → “Web Upload.”
Select your game files packed as a ZIP, leave the dropdown set to “Standard,” and click “Upload.”
After a successful upload, a confirmation dialog appears asking whether to register the upload as an official build. The Notes field is optional—you can fill it in later. Leave “Set Build Live on Branch” set to “None” for now; branch configuration is done separately in the build screen. Click “Commit” to finalize.
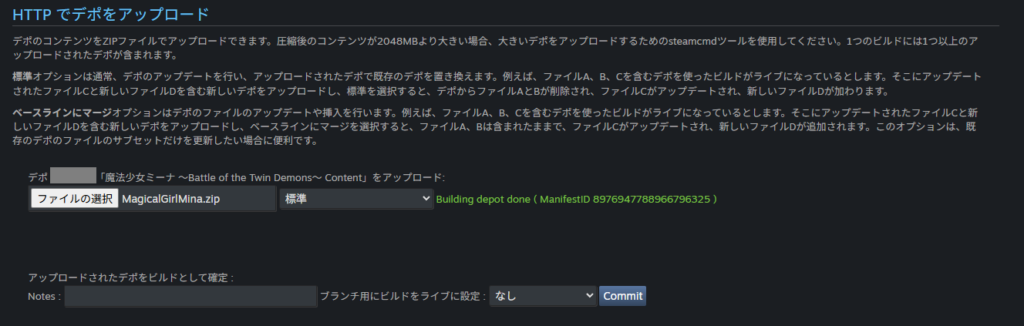
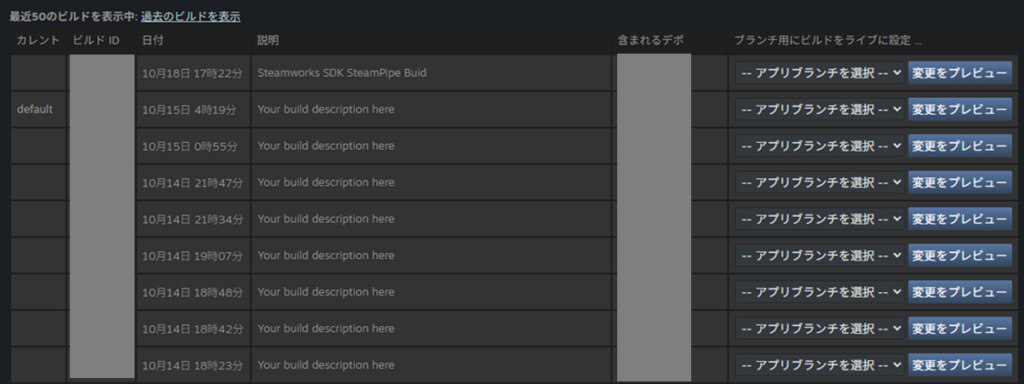
After committing, go to “SteamPipe” → “Builds.” The newly uploaded files should appear there with an assigned Build ID.
Currently no branch is assigned to this build, so it won’t be visible to users yet—branch configuration is covered next.

Steamworks SDK Upload (No File Size Limit)
For files over 2 GB, use the Steamworks SDK method.
The Steamworks SDK is the official developer kit provided by Steam. It’s used to upload game files to Steam and provides additional features such as API access and cross-platform support.
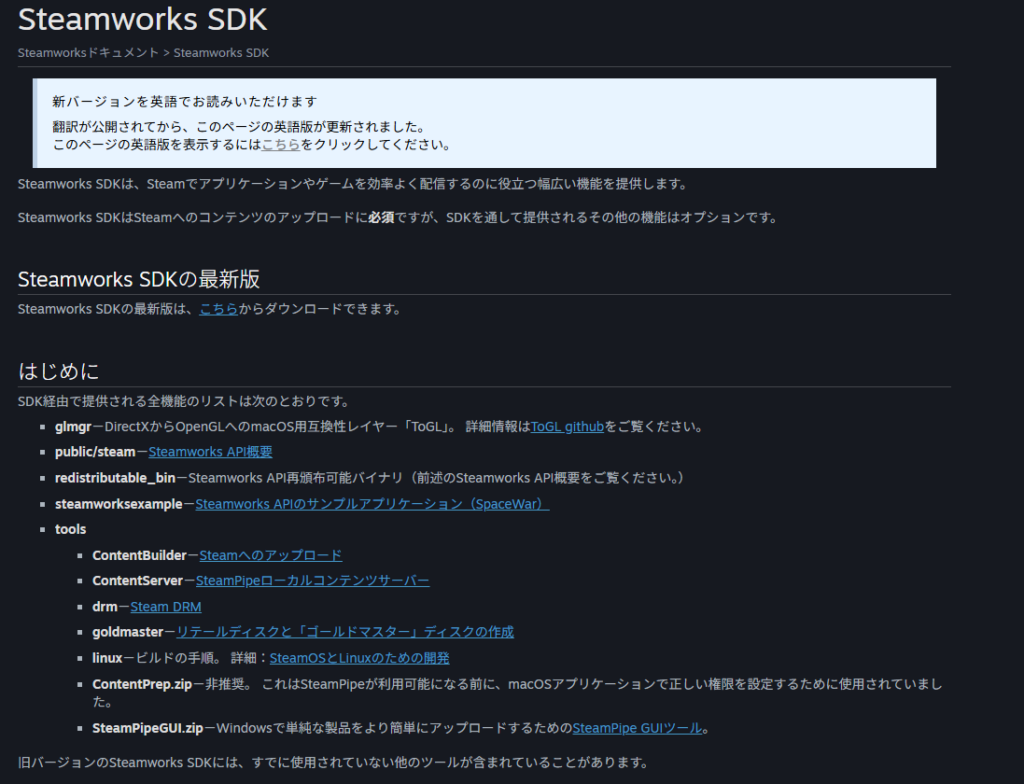
The actual upload feature within the SDK is called “ContentBuilder,” which is command-line only—not beginner-friendly. To make uploads accessible, Steam provides SteamPipeGUI, a graphical interface that runs ContentBuilder behind the scenes.
Let’s download the Steamworks SDK. Click the “Step-by-step guide” link in the demo build checklist, or navigate directly to the official docs.
On the Steamworks documentation page, click the “here” link under “Downloading the Steamworks SDK” to download the latest version.
You’ll download a ZIP file (steamworks_sdk_xxx.zip). Extract it to a location on your PC—preferably somewhere without Japanese characters in the path (e.g., directly under the D: drive).
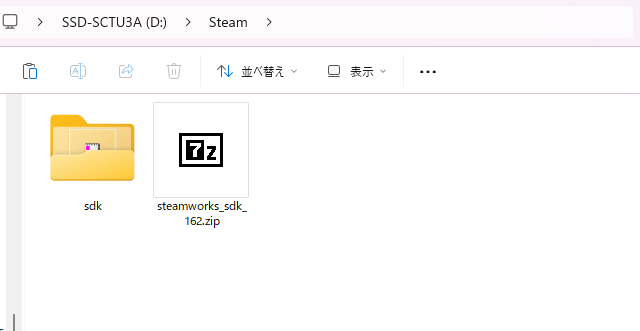
Inside the extracted folder, you’ll find an sdk folder. Navigate to sdk\tools and extract SteamPipeGUI.zip there as well.
The result should look like this:
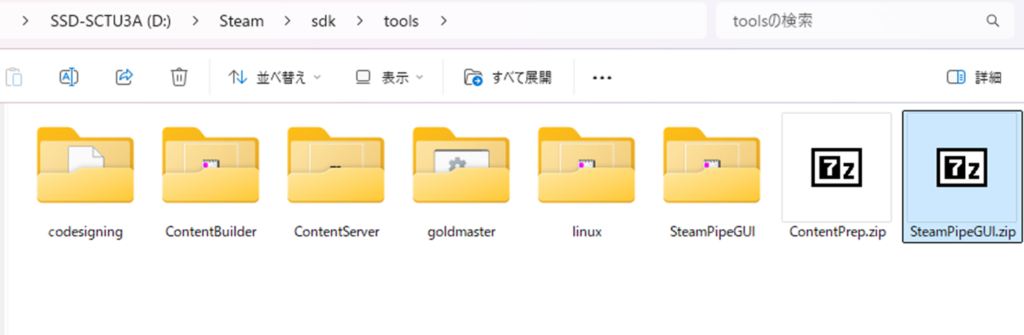
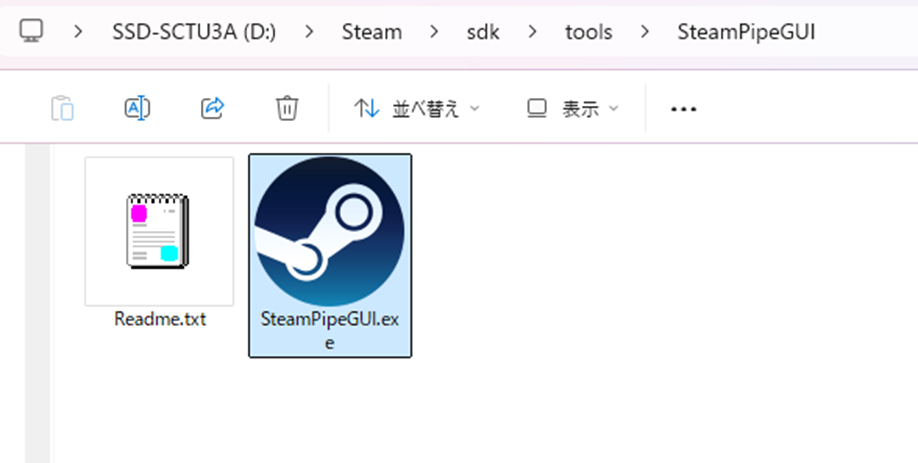
Open sdk\tools\SteamPipeGUI and double-click SteamPipeGUI.exe to launch it.
Once SteamPipeGUI is open, enter the following:
- AppID: The App ID shown next to the app name in Steamworks (use the demo app’s ID)
- Build Description: A memo—enter anything you like
- Depot ID: The Depot ID shown in the Steamworks depot screen (use the demo app’s ID)
Note: on first use, click “Add Depot” to add the target depot - Build Path: The folder containing your game files (avoid Japanese characters in the path)
Note: with this upload method, you do NOT need to ZIP the files first - Steamworks SDK ContentBuilder: The full path to
sdk\tools\ContentBuilder(required to run ContentBuilder in the background) - Steam Login: Your Steamworks account username
- Steam Password: Your Steamworks account password
Once all fields are filled in, click the “Upload” button on the right side of the screen.
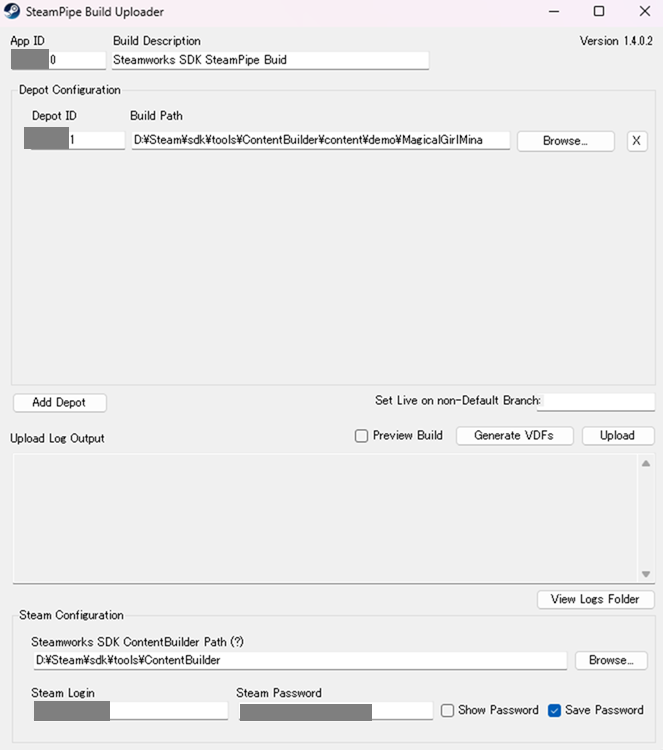
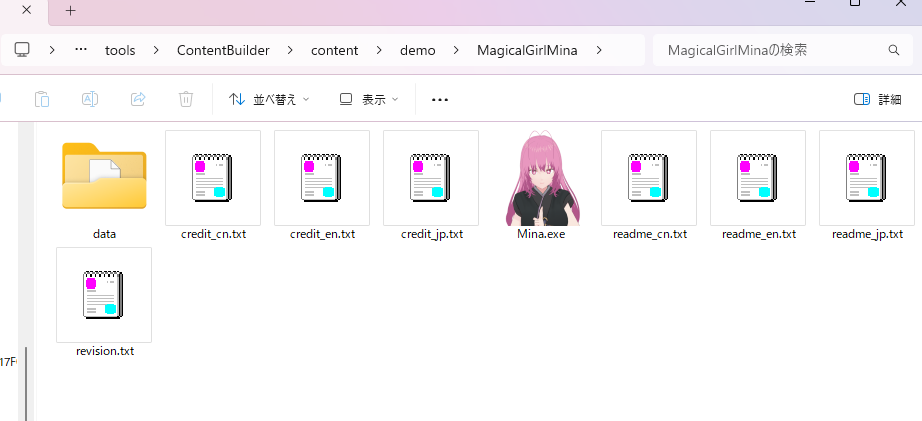
For reference, here’s the folder structure I used: the MagicalGirlMina folder contains Mina.exe directly at the root level. With the settings shown in the screenshot above, this structure uploads and runs correctly.
A command prompt window will open during the upload—this is normal and can be ignored. On the first upload, you may be prompted to enter a 5-character code sent to your email—just check your inbox and respond.
When the upload succeeds, “Success!” will appear at the end of the “Upload Log Output” area.

After uploading, check the Steamworks build screen. The game files you just uploaded should appear as the newest Build ID at the top of the list. That covers both upload methods.
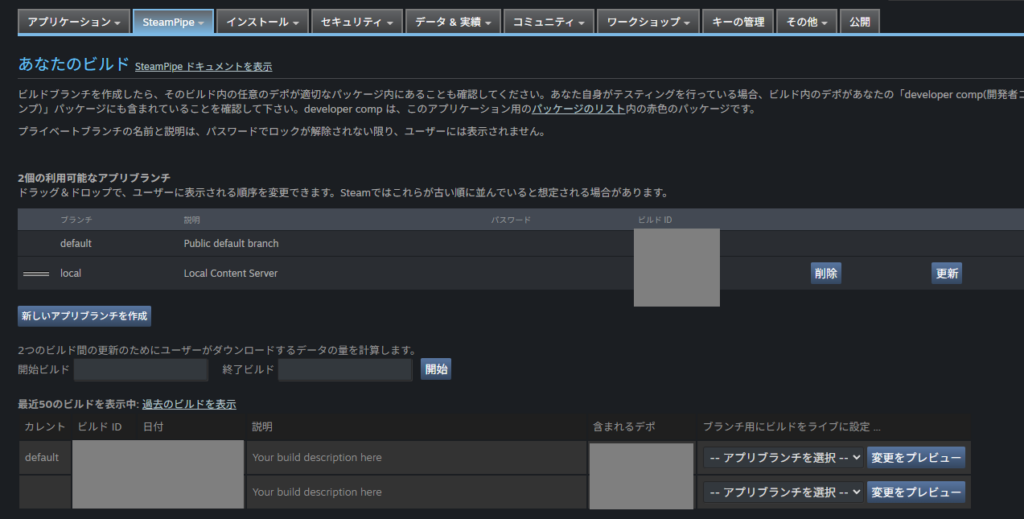
Setting the Default Branch
Uploading alone doesn’t make the build available to users. You also need to set the build as the “default” branch.
In the Steamworks build screen, find the column labeled “Set Build Live On Branch” to the right of the build history list. Select “default” in the row of the Build ID you want to publish, then click “Preview Change.”

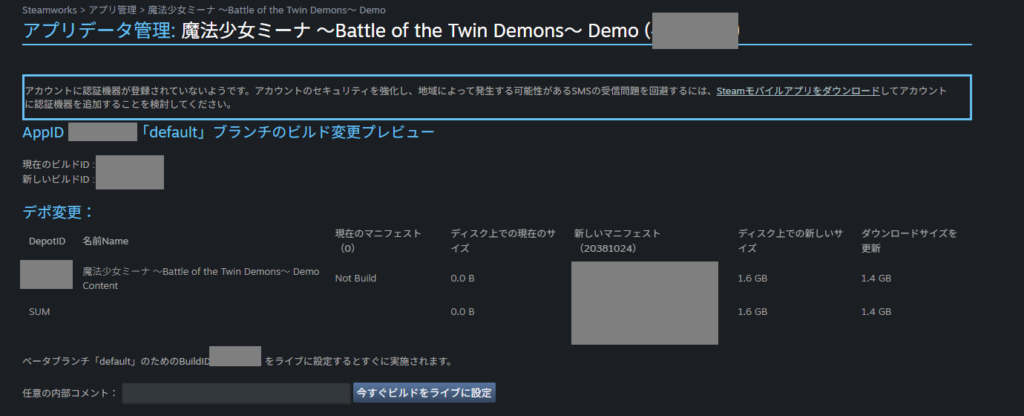
A branch change preview screen appears. Confirm that the default branch is being set to the correct Build ID.
The optional comments field at the bottom is useful for notes like “Initial release” or “ver1.00”—helpful for future reference.
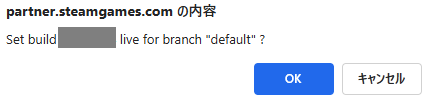
Once reviewed, click “Set Build Live Now.”
A confirmation prompt appears—click “OK.”
Back in the build screen, verify that the “Current” column for your selected Build ID now shows “default.”
Branch configuration is now complete. You can’t verify the game’s launch yet because other settings still need to be configured—that’s covered shortly.
Setting Launch Options and Install Directory
Back in the build checklist, the next two items are “Defined Launch Options” and “Set Install Directory.” Both are configured in the same place: “Technical Tools” → “Edit Steamworks Settings” → “Installation” → “General Installation.”
First, set the “Install Folder” field to the folder name that users will see when they download the game. Using the same folder name as your uploaded game files is fine, but avoid Japanese characters—folder names with Japanese characters may cause launch issues for non-Japanese players (Steam’s documentation also recommends English).
For the demo, I added _demo as a suffix to avoid potential conflicts if users have both the demo and full product installed in the same location. Using the same folder name might share save data between demo and full product—I haven’t investigated this thoroughly.
After entering the folder name, click “Update Install Folder” to save.
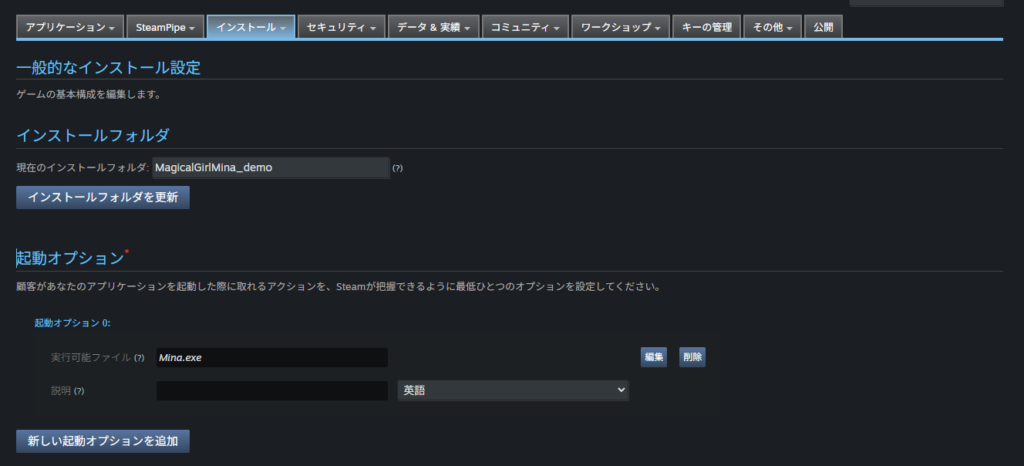
Next, configure “Launch Options” in the middle of the page. For most games, this means specifying the path to the executable that launches the game.
If the .exe file is at the root of your uploaded folder, you only need to specify the filename itself (as shown in my upload folder screenshot). If the exe is in a subfolder, specify the path accordingly (e.g., MinaFile\Mina.exe).
If you’re using a different launch mechanism, make sure to verify it works correctly in the post-build launch test described later.
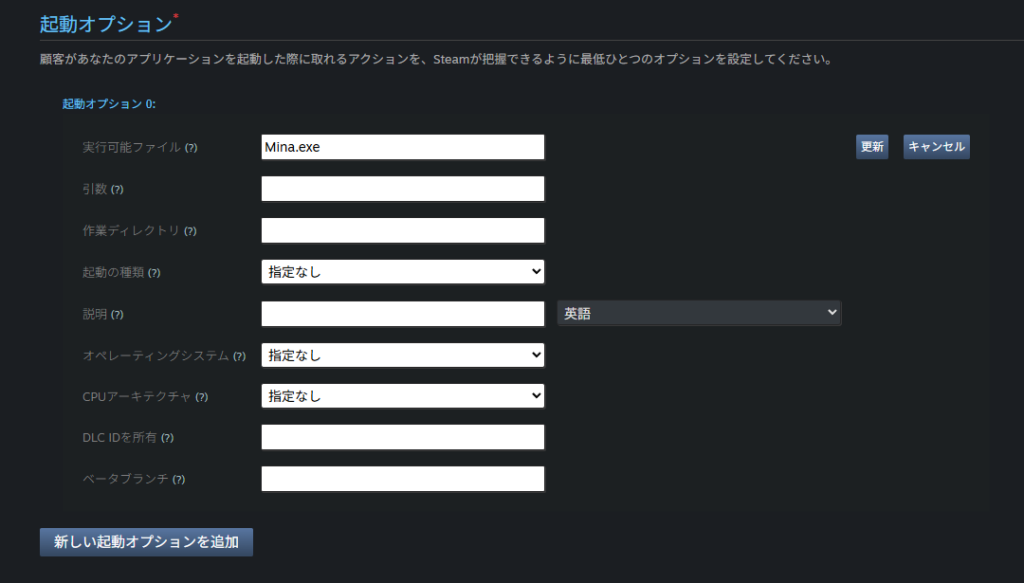
Important: changes to Launch Options and Install Directory do not take effect until you “Publish” them. Remember that these settings require a publish step to apply.
Depot Language Configuration
Next in the checklist: “Depot Language Set.” Go to “Technical Tools” → “Edit Steamworks Settings” → “SteamPipe” → “Depots.”
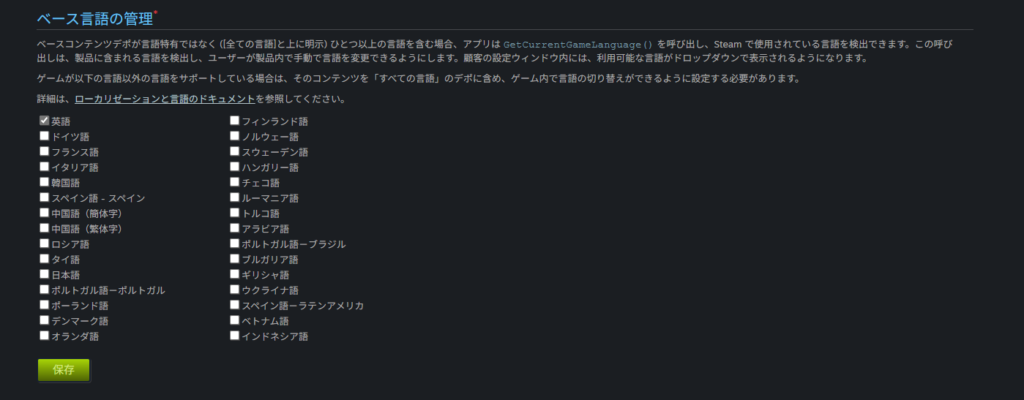
At the bottom of the page, set the “Manage Base Languages” field to the base language for your game. If your game supports English, set this to English. Japanese-only games can set this to Japanese, but for any internationally-released game, English is the standard choice.
Other Settings
The remaining build checklist items will likely be checked off automatically once you’ve completed everything above—mine were, without any extra steps. If something remains unchecked, investigate individually, but significant issues are unlikely.
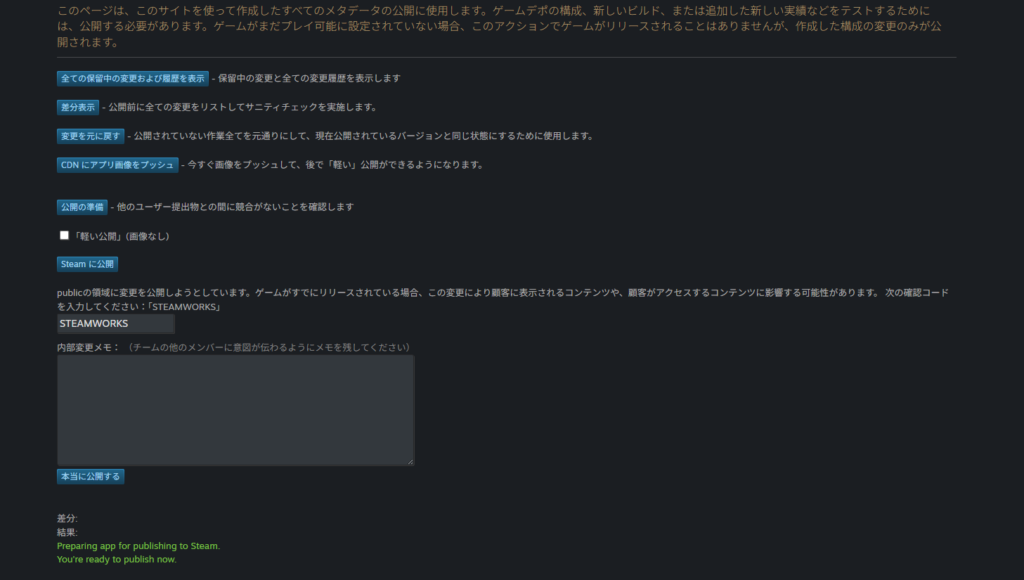
Publishing
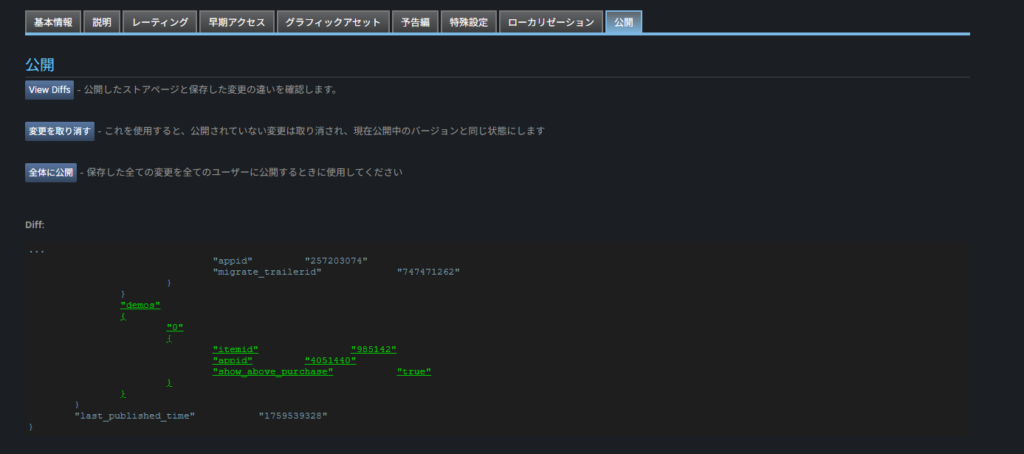
With all settings complete, use “Publish” to apply them. Go to “Technical Tools” → “Edit Steamworks Settings” → “Publish.” A confirmation screen appears.
To review what changed, click “Show Diff” to see a text-based diff of your modifications. “Revert Changes” lets you roll back to the current published state if needed.
“Light Publish” seems to offer faster publishing for text-only changes that don’t involve game files or images—but you likely won’t need it.
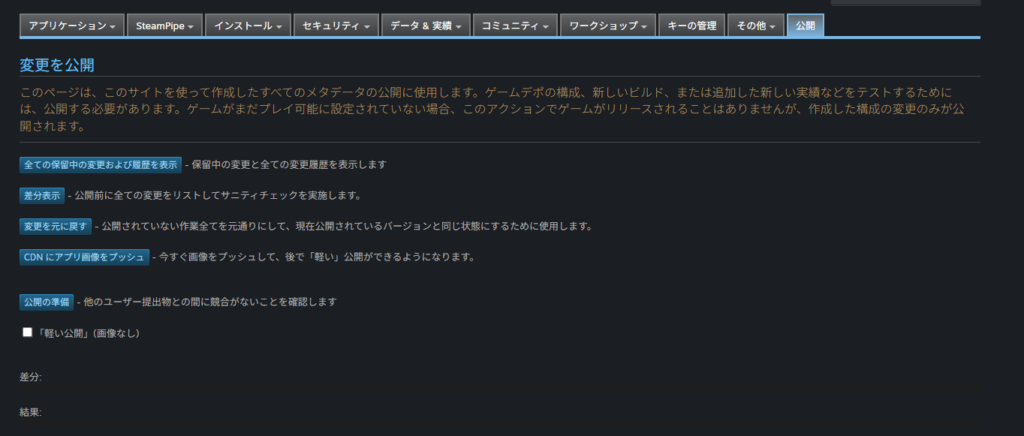
Check the diff if you like, then click “Prepare for Publishing.” Type “STEAMWORKS” in the confirmation field, add an internal note, and click “Really Publish.”
Note: if you’re following this guide in order, you haven’t submitted the demo build for review yet—so publishing at this stage won’t make anything visible to users.
When publishing completes, a confirmation message appears. If you’ve already released the full product, or want to announce updates, posting a Steam news announcement is a good idea. For now, since nothing is visible to users yet, you can skip that.
After the demo is released and live, any subsequent “Publish” will immediately make changes visible to all users. Always test changes in beta mode before publishing.
One important note: branch changes may take effect immediately without a publish step—based on my testing, switching branches appeared to reflect instantly without publishing. Keep this in mind when changing branches after release.
Post-Build Launch Verification
Before submitting for review, verify that the game actually launches correctly.
Go to “Store Presence” → “View Store Page” → “View in Beta Mode.”
The demo store page will open. Click “Install Demo.” If the button isn’t visible, the default branch may not be set or the publish step may be missing—check both.
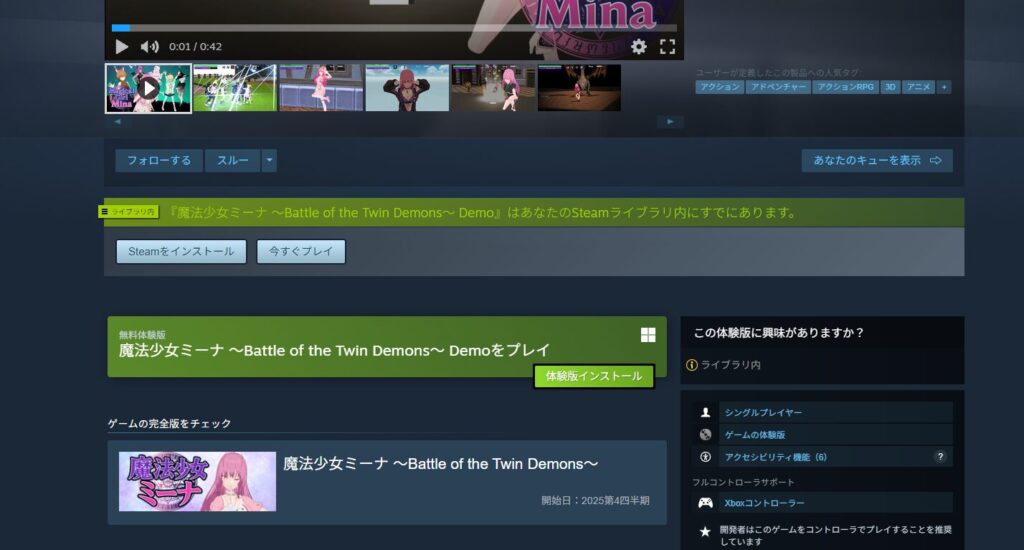
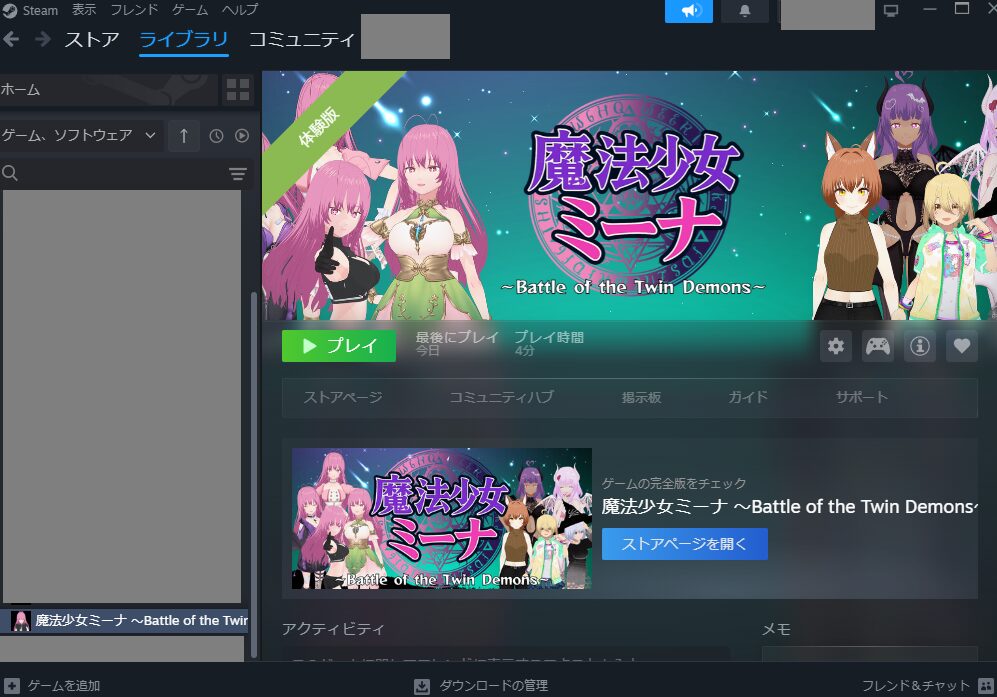
After successful installation, the demo appears in your Steam library (check the Steam desktop application, not the browser). Click “Play” to launch it.
If everything has been set up correctly, the game should launch without issues.
First-time success isn’t guaranteed—errors are common. When they occur, the messages are often vague. Here’s a useful troubleshooting approach:
Right-click the demo in your Steam library, then go to “Manage” → “Browse Local Files.”
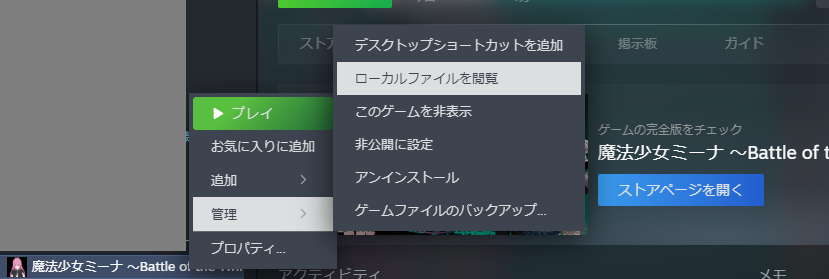
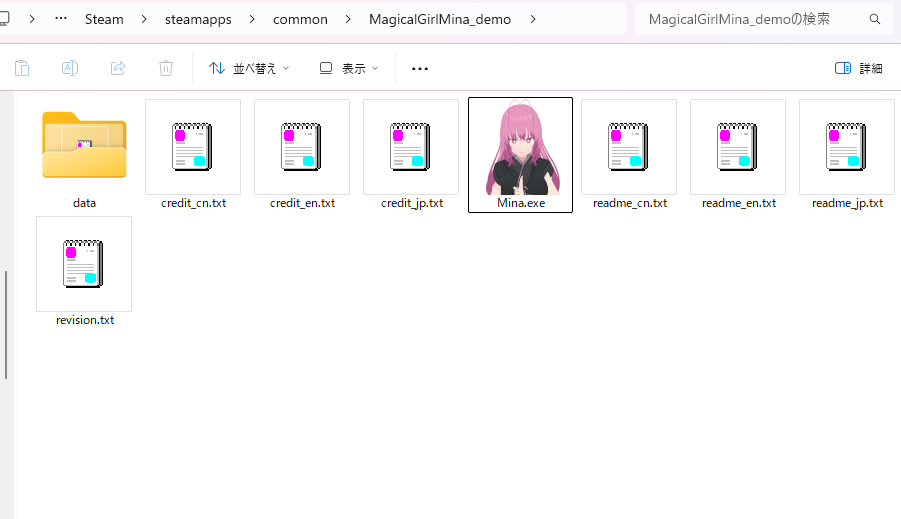
This shows the folder structure of the installed game. Verify that it matches your expectations.
In my case, the install directory “MagicalGirlMina_demo” contains Mina.exe directly at the root—and this structure runs correctly.
For diagnosing errors: try launching the .exe directly from the file system. If it launches that way but not through Steam, the issue is likely in your Install Directory or Launch Options configuration. If the direct launch also fails, the issue is probably in the uploaded files themselves.
Work through errors systematically until the game launches successfully.
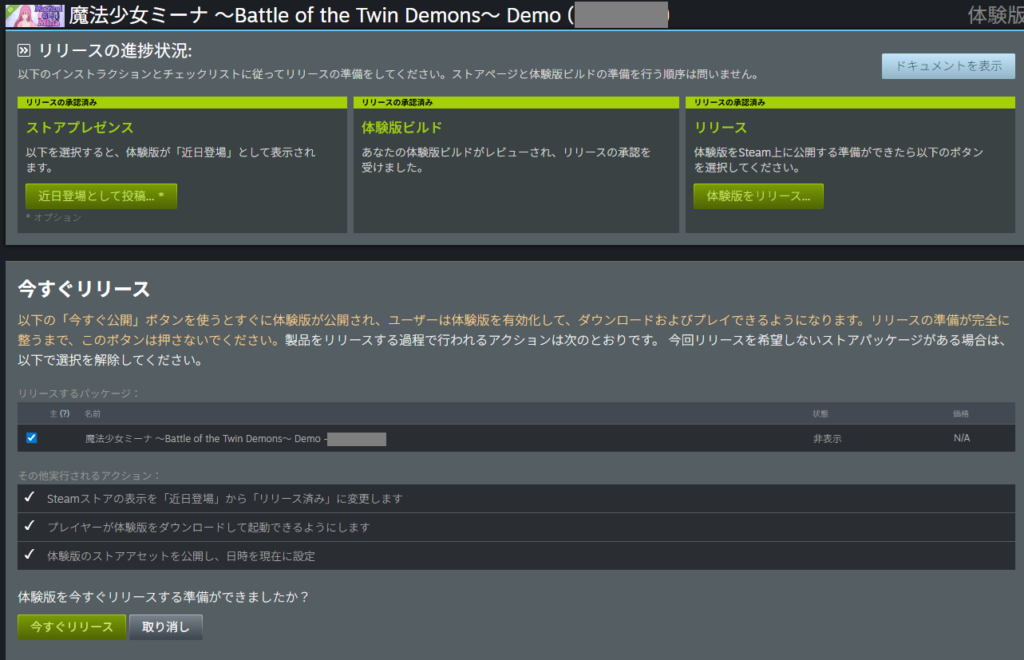
Demo Build Review
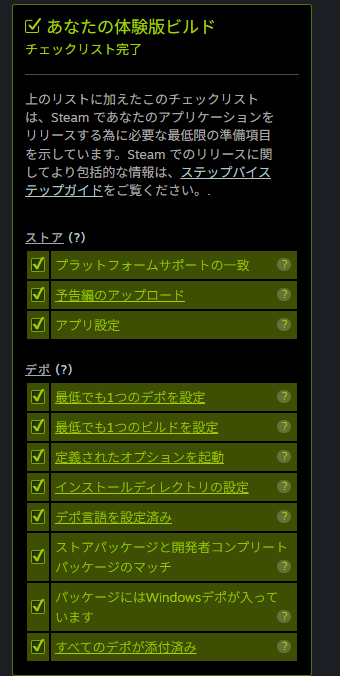
Once all the above is complete, the game build (demo build) is ready to submit. Confirm that all checklist items are complete.
Click “Ready for Review” in the “Demo Build” section at the top of the app management page.
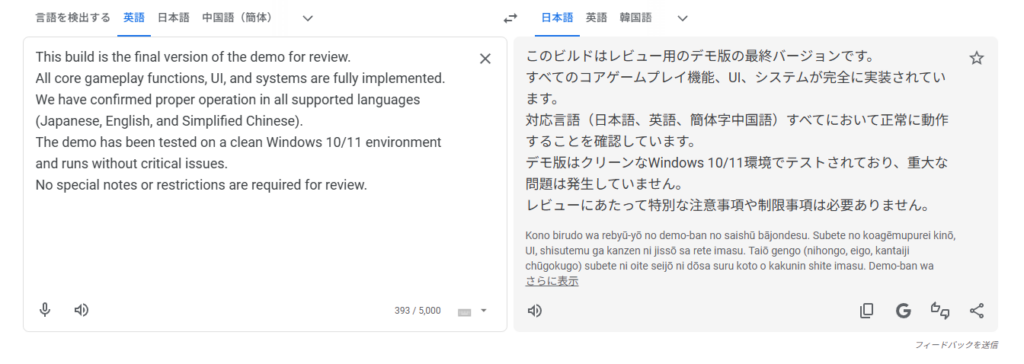
A notes confirmation screen appears, similar to the store page review. Briefly describe the demo (e.g., what content is included) and click “OK.”
Here’s what I wrote in my submission notes. Feel free to adapt it for your own submission (ChatGPT helped me draft most of it):
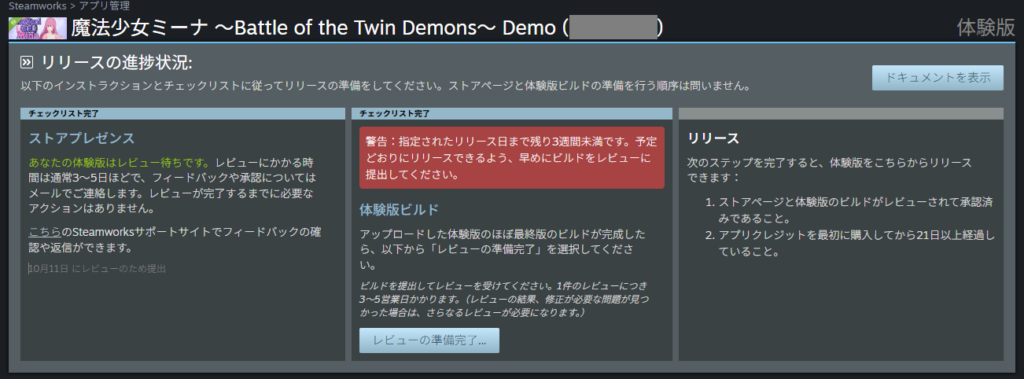
After submitting, Steam indicates the review will take 3–5 days.
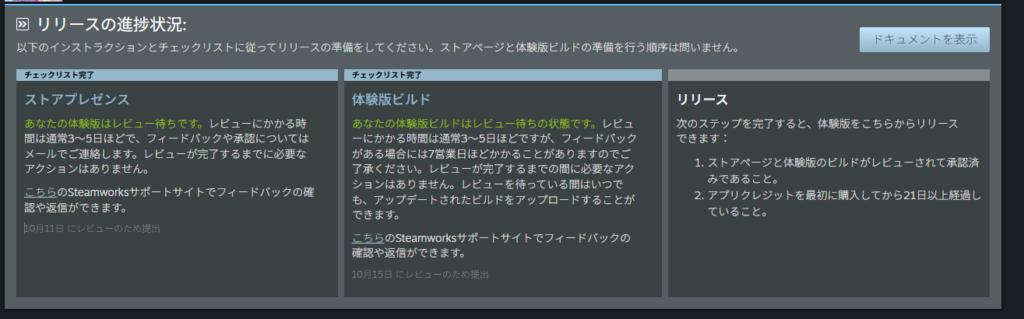
After over a week with no response, I found this message indicating the build review was taking longer than usual. The delay was partly my fault—I submitted during Steam Next Fest. Try to avoid major event periods when submitting, or plan for extended wait times.
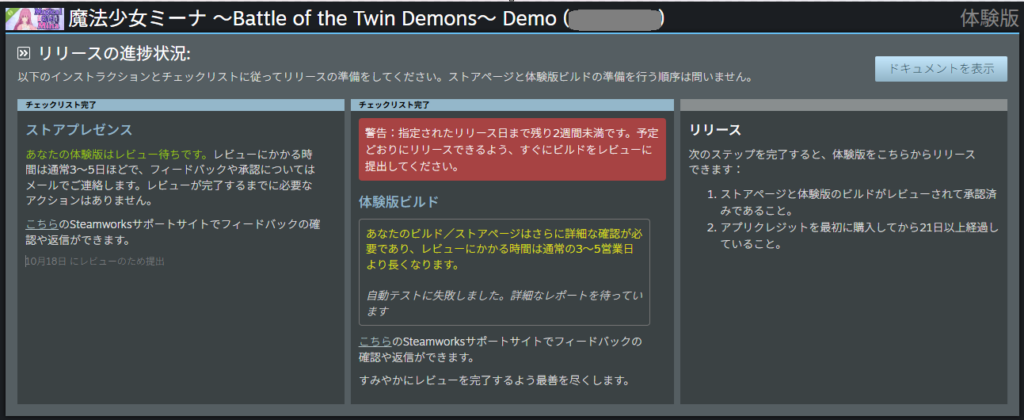
After another wait—roughly a week and a half total—my build was flagged for a content questionnaire issue related to sexual content.
https://twitter.com/FoxEngineer777/status/1981883698858656234
My game features a protagonist named Mina whose chest bounces during movement, and certain attack animations expose her underwear. Steam flagged this as sexual content—which is a fairly strict standard, but understandable.
After updating the questionnaire and resubmitting, the review passed in about four days.
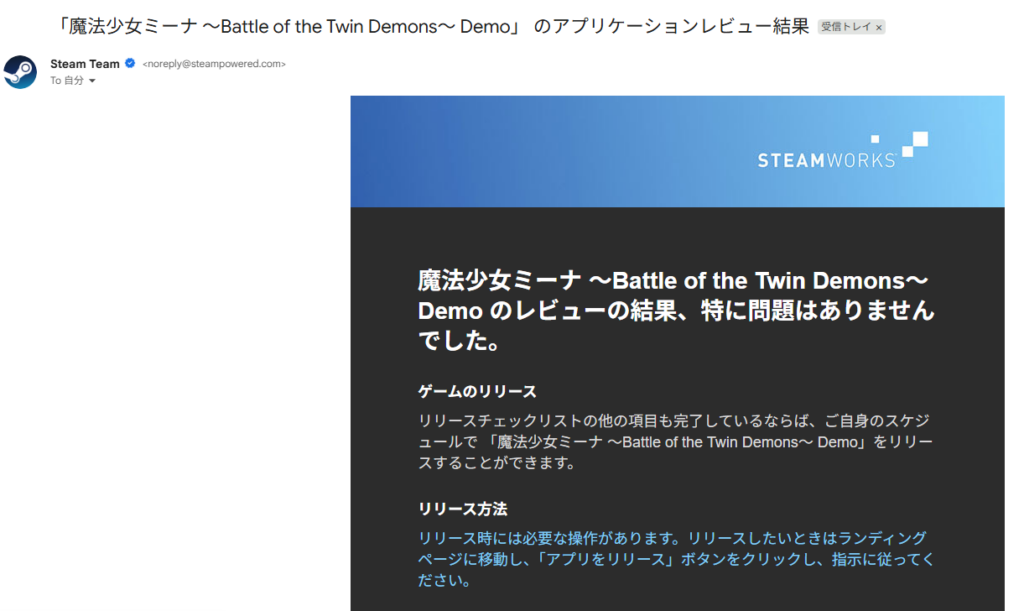
Demo build complete! Both store page and build reviews each took over two weeks. At this point, just assume Steam reviews take around two weeks and plan accordingly.
Releasing the Demo
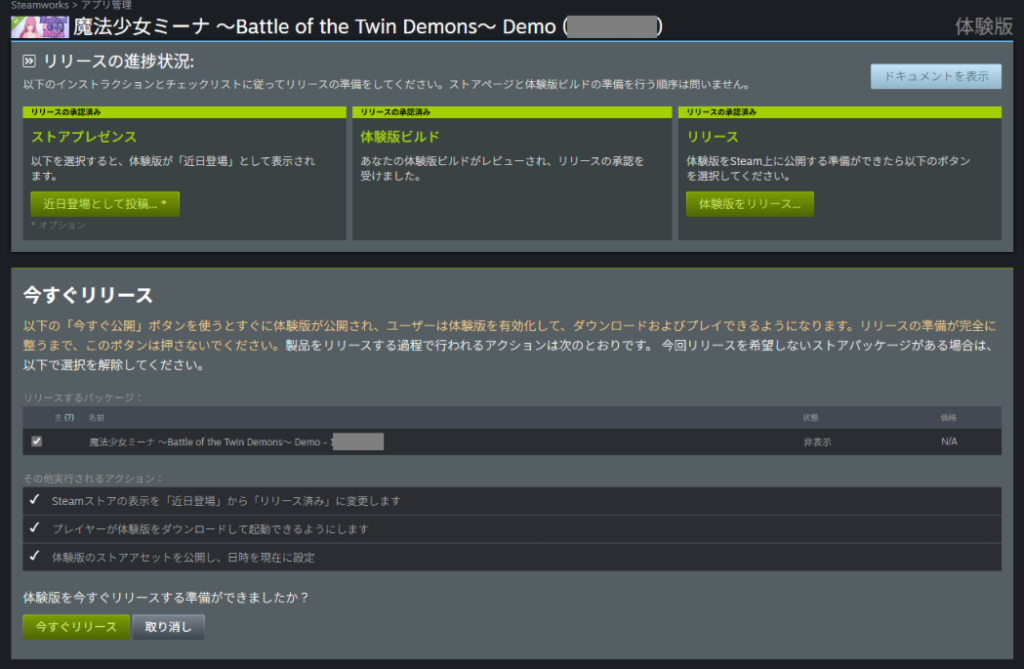
Once both the store page and build reviews are approved, releasing the demo is just a button press—but hold on before hitting it.
The demo release is one of the best promotion opportunities available to solo and indie developers. When I posted casually about indie game marketing on X, the response was substantial, so I’ll share a few promotional approaches here.
https://twitter.com/FoxEngineer777/status/1977529466583761140
Low-cost promotion options for independent developers:
- Send press releases to media outlets
- Participate in events (Steam Next Fest, etc.)
- Request reviews and coverage (distribute keys to curators, contact streamers)
- Promote on overseas platforms (Reddit, Bilibili)
Of these, sending press releases is free, has no complex requirements, and can have a real impact—worth doing without exception.
Option 2 depends on event timing and isn’t always applicable. Option 3 is generally more effective at the full product launch than at the demo stage. Option 4 may be worth trying at the demo stage as well—I may add notes on this later if I try it.
That said, promotional impact from any of these may be limited for a small solo title.
I plan to write a dedicated article on promotion once I’ve completed the full product release and have more real data on what actually worked.
What Is a Press Release?
A press release is an announcement directed at media outlets. It might sound overly formal, but press releases are entirely normal even for solo indie developers.
That said, posting on your own site or social media isn’t enough—the goal is to contact media outlets and request coverage, giving them a story they can write about.
If a media outlet picks it up, their distribution power effectively serves as free promotion for your game.
Best of all, reaching out to media is generally free (paid services like PR TIMES offer guaranteed placement, but they’re optional). The catch is that pickup depends on the game’s visual appeal and luck—sending to ten or fifteen outlets and having one or two pick it up is a reasonable expectation.
When to Send Press Releases
Common timings for indie developers selling on Steam:
- When the Steam store page goes live
- When the demo releases
- When the full product launches
Established indie studios might also send press releases for title announcements, major updates, or release date announcements—but for solo or small teams, these are harder to get coverage for.
Avoid sending press releases too frequently—media outlets may develop a negative impression. Stick to major milestones.
Detailed instructions on how to send a press release are beyond the scope of this article, but searching “indie game press release” will surface plenty of guides from others who have done it.
The ideal timing for sending is the day of or 1–2 days before the demo goes live (the day-of is easier for media to act on quickly). Sending too late after the release reduces news value significantly—try to send the same day if possible.
Don’t Forget to Post to the Steam News Hub
While the Steam News Hub may not drive a lot of traffic, it’s worth using if you have the time.
Solo developers often skip this entirely, so it’s an optional step—but it’s good practice.
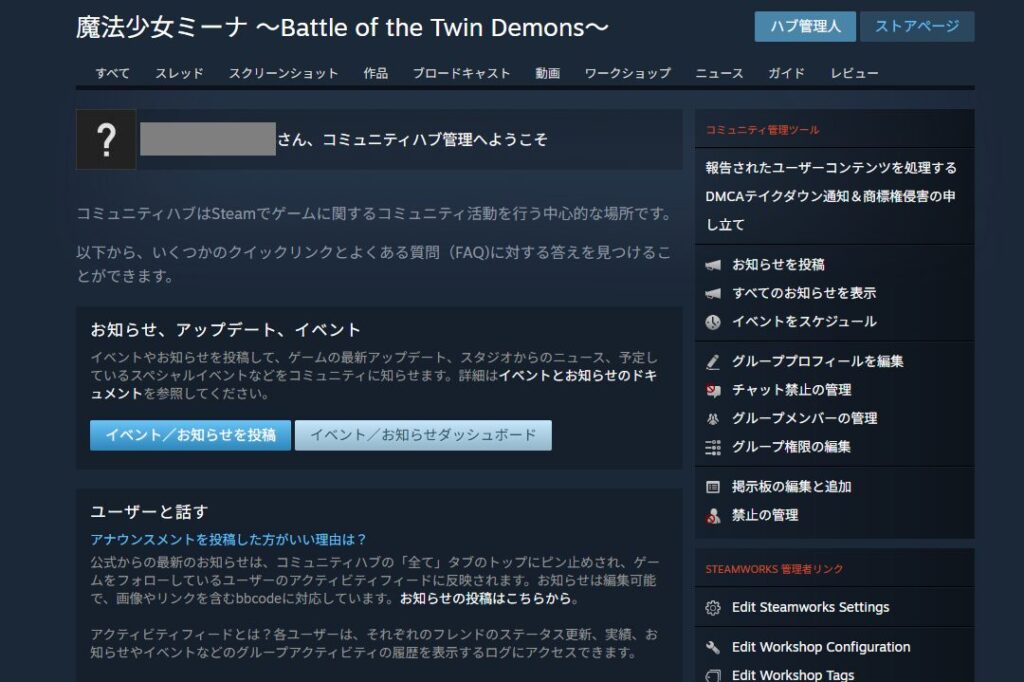
To access it, go to the full product app’s “App Admin” page, scroll to the bottom, and click “Community Hub Admin.”

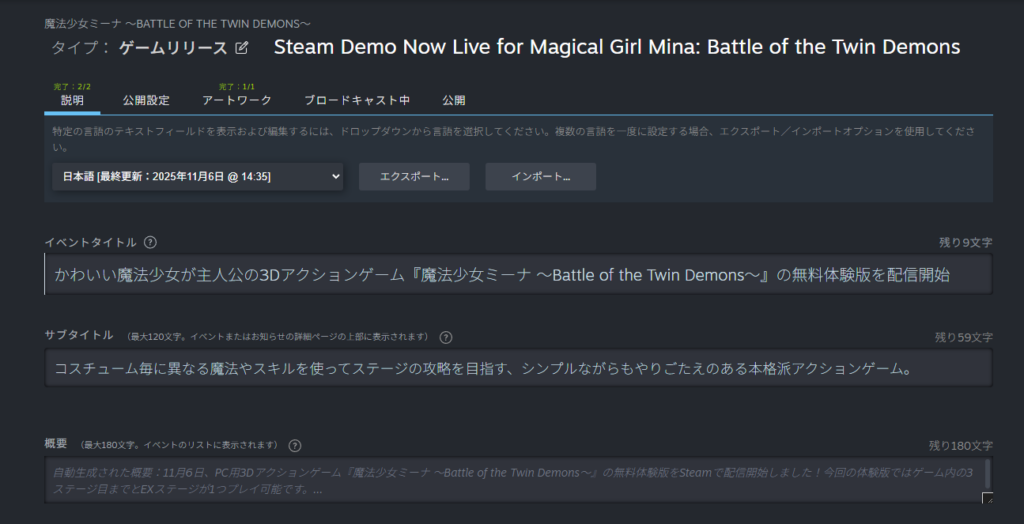
In the Community Hub Admin screen, click “Post/Edit Event or Announcement” under “Announcements, Updates, and Events.”
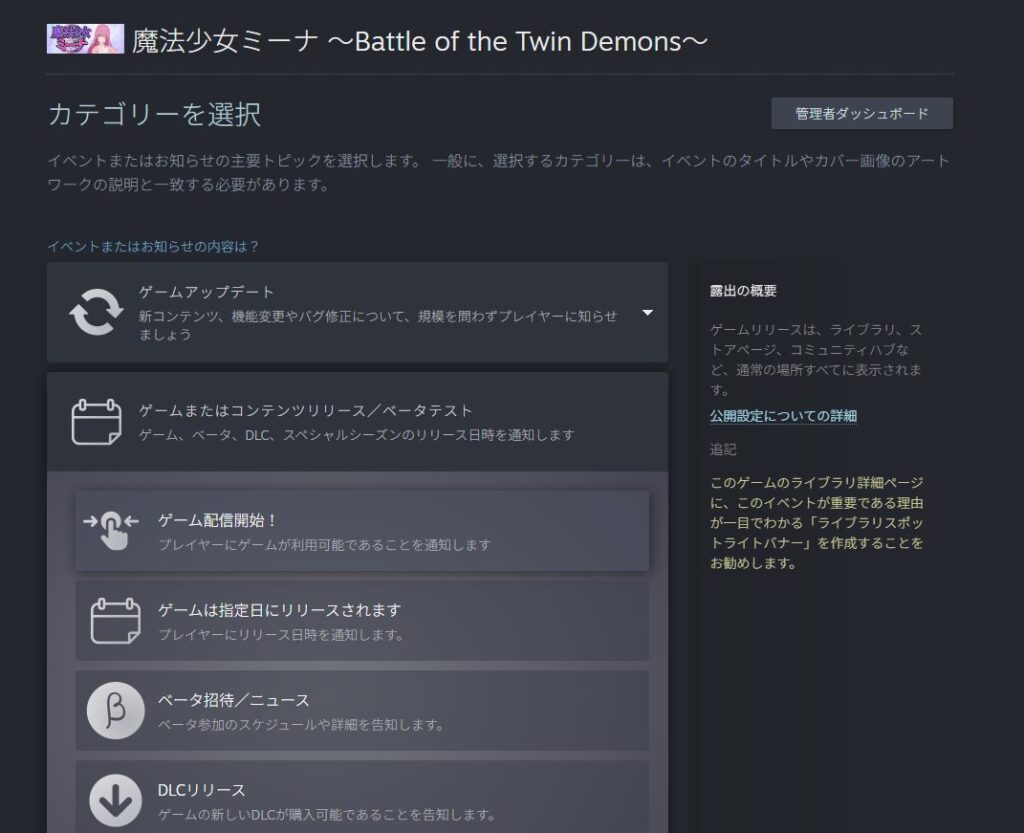
A category selection prompt appears. For a demo release, “Game Release!” seems like the most appropriate choice—though some developers use “Free Trial” for demos. Either should be fine.
After selecting a category, a detail entry screen appears. A full walkthrough of this is outside the scope of this article—using the same content as your press release (or a lightly modified version) is sufficient.
For multi-language games, you’ll need to write separate versions in each language.
The Steam news post supports scheduled publishing—set a specific date and time under the “Publish Settings” tab.

I published mine manually at the time of the demo release by clicking the “Publish” button in the “Publish” tab.
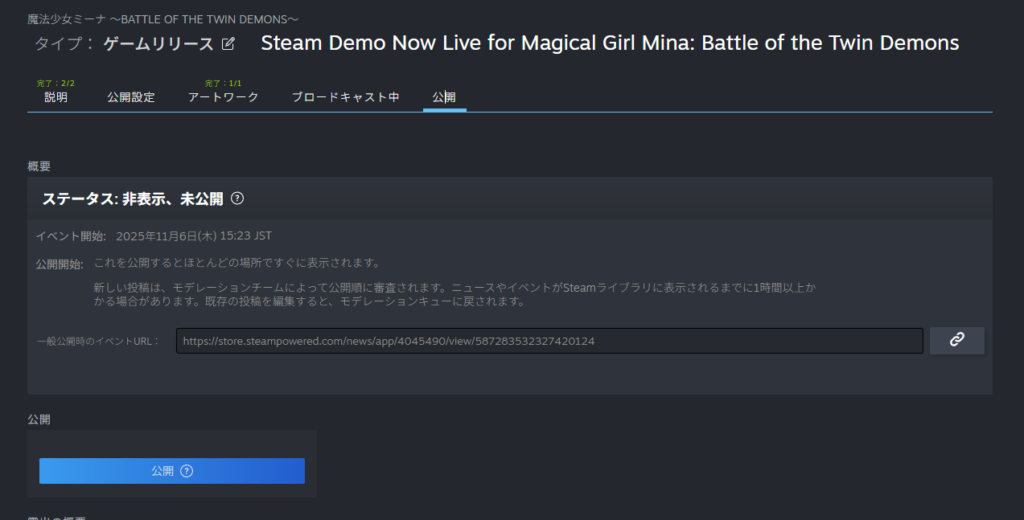
Once published, the post status changes to “Public” and becomes visible to other users.
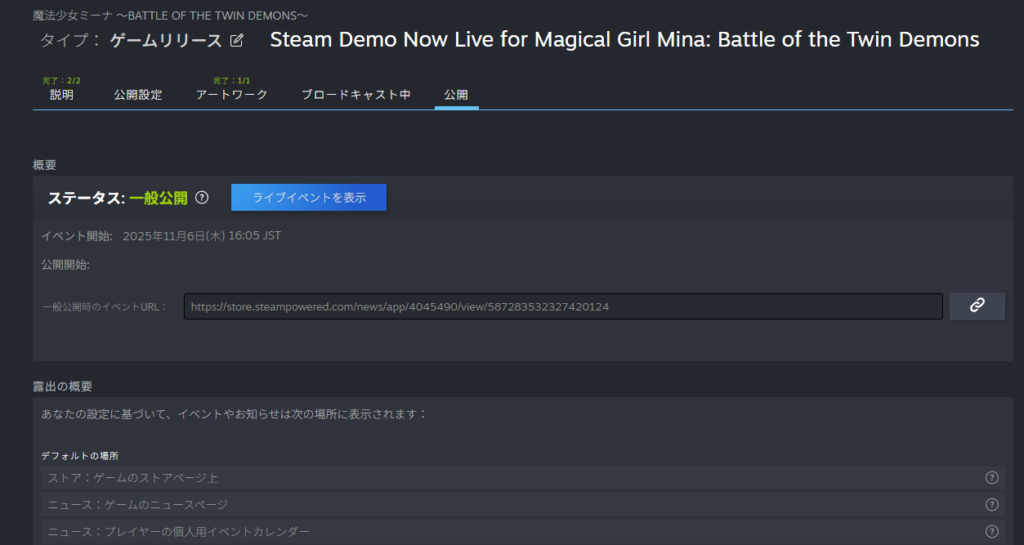
You can verify the news post is live by checking the Steam News Hub for your game.
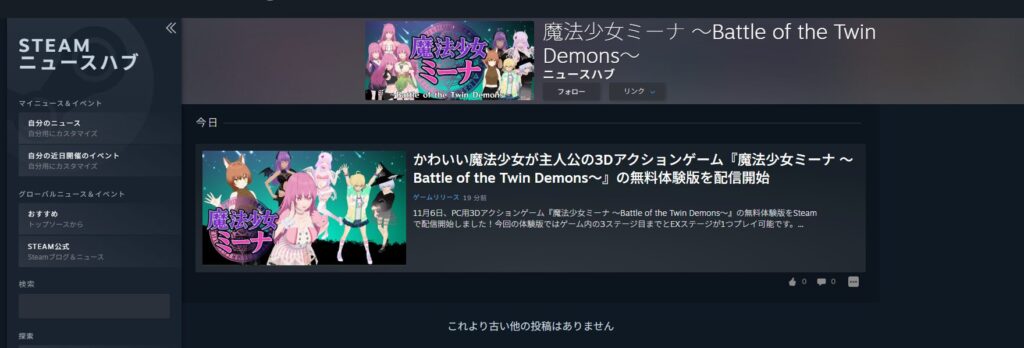
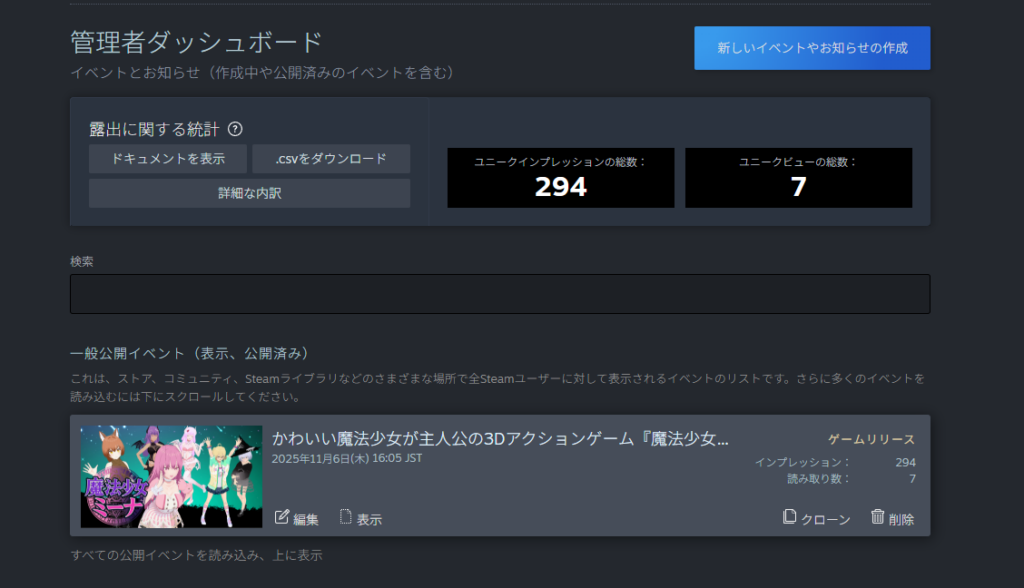
For context: my news post got roughly the following impressions (number of times the post was displayed) and views (number of times it was actually read) in its first 24 hours. The promotional impact was minimal—but it’s still worth doing as a signal that development is active.
Finally: Releasing the Demo
After preparing the press release and Steam news announcement, all that’s left is the release itself.
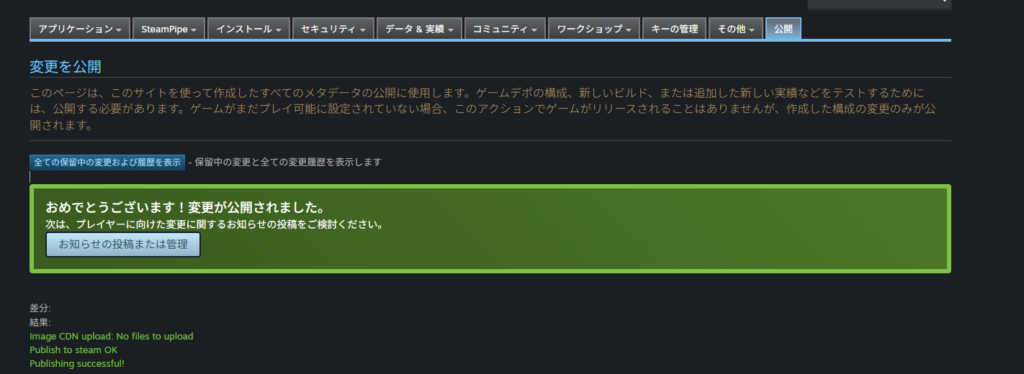
Go to the demo app management page and click “Release Demo” under “Release” at the top of the page. Then click “Release Now” in the prompt that appears.
Note that Steam doesn’t support scheduled releases at a specific time. You must click the release button manually (the same applies to full product releases). If you’ve announced a specific launch time publicly, make sure you’re available to click the button at that time.
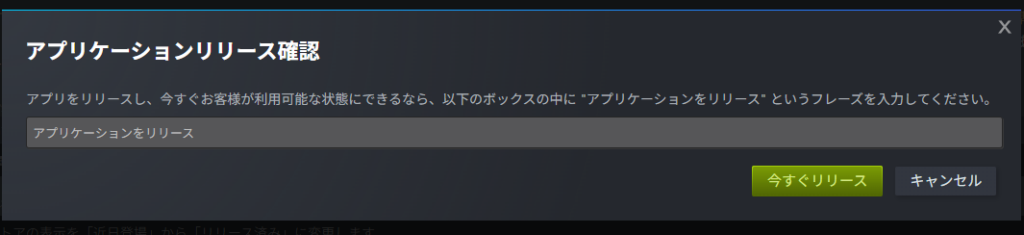
A second confirmation screen appears—enter the required text and click “Release Now” again.
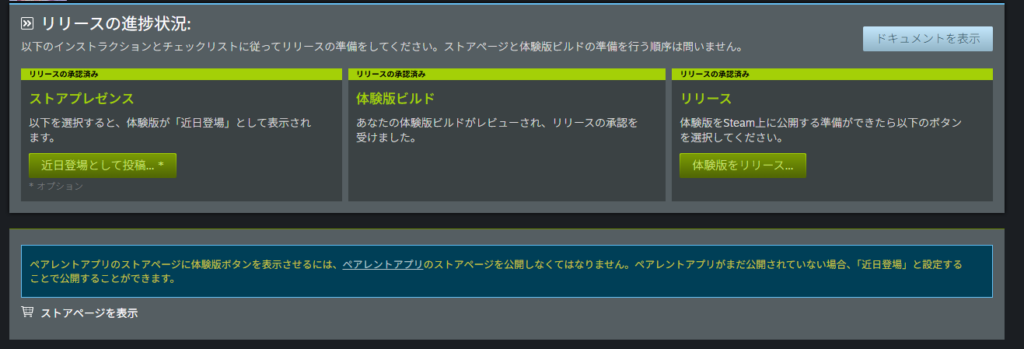
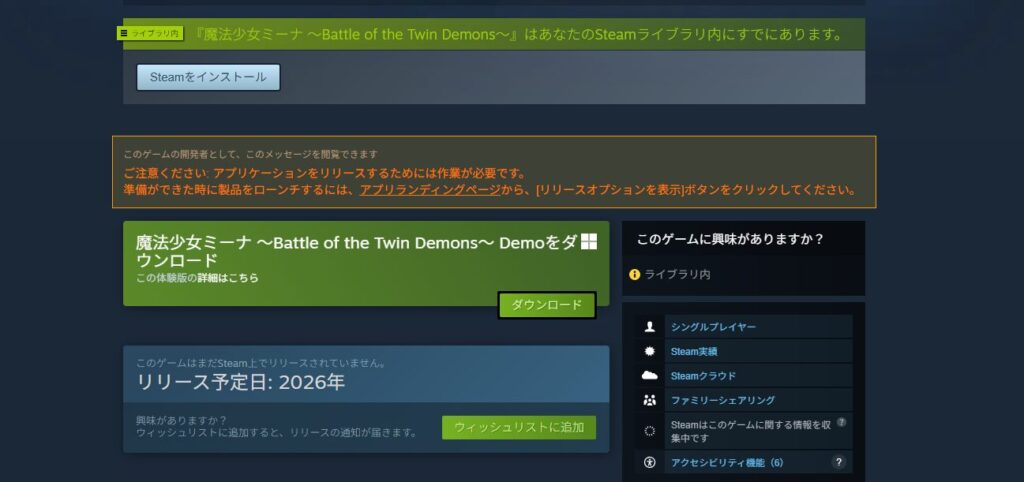
Once released, the following screen appears. There may be a few minutes of lag before changes fully propagate, but the “Install Demo” button should appear on the demo’s store page shortly.
However, the full product’s store page may not show an “Install Demo” button right away. Looking at the demo app’s screen, there’s a note suggesting something needs to be done on the parent app (full product) side.
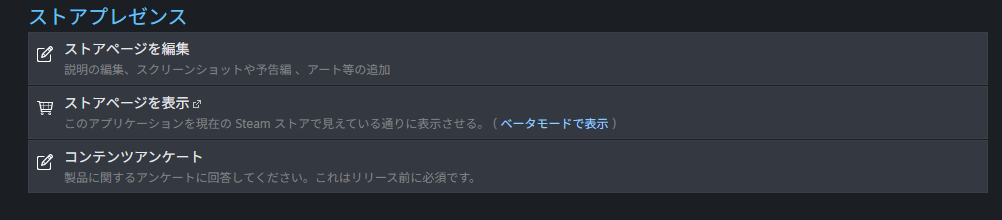
Go to the full product’s “Edit Store Page” → “Special Settings.” A new “Associated Demo” section will appear.
Inside, there’s a checkbox labeled “Display the demo download button prominently above the purchase options.” Check it and save.
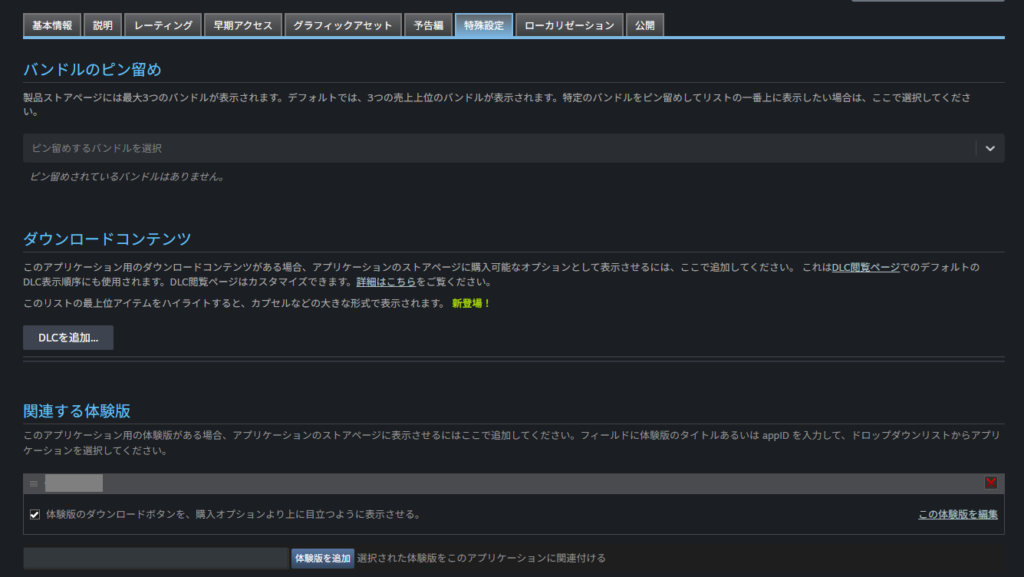
Saving alone doesn’t update the store page—go to the “Publish” tab, check the diff, and click “Publish to All.”
After publishing, the “Install Demo” button will appear on the full product’s store page as well.
In hindsight, the wording of that checkbox was completely unintuitive—but that’s Steam.
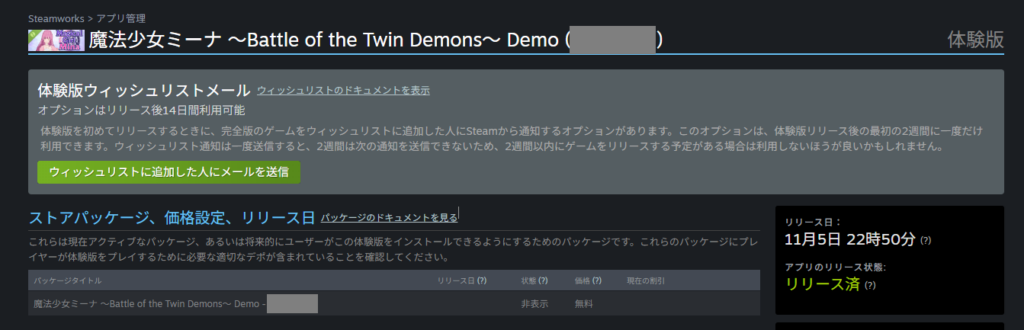
After everything is done and you refresh the demo app’s Steamworks page, you may see a prompt asking whether to send an email to wishlisters.
Steam allows one wishlist email notification per app. My wishlist count was around 100 at the time, so I decided the impact would be minimal and skipped it. (It appears you get one per demo and one per full product—two total.)
In general, sending a wishlist notification at demo launch is recommended. One caveat: after sending, the feature is locked for two weeks. If you plan to release the full product within two weeks of the demo, you may want to save the notification for the full release instead.
Summary
This article covered everything involved in registering a demo on Steam. Honestly, I didn’t expect this to turn into a 20,000-word article—or around 25,000 words when combined with the terminology article.
In hindsight, the press release and news hub sections probably didn’t need to be in this article, but they didn’t fit neatly elsewhere either.
For the build process, the most essential things to master are the upload method and branch switching—the rest of the details are supplementary. Don’t feel like you need to understand every part of this article; just take what’s useful.
If there’s one thing that causes the most confusion when working with Steam, it’s the unexpected “first-time traps”—like the Install Demo button situation at the end. Steam has far too many of these, and they’re often the things that trip people up the most.
Either way, everything described in this article will need to be done again for the full product. That’s a daunting thought—but the path forward is clear.
That’s all for this article. For other Steam-related articles, see the main overview article linked below.
📚 Series: How to Sell Your Game on Steam (4/7)
