Bakin Update: Direct VRoid Import Now Possible
On December 18, 2024, Bakin’s major update Ver1.13 was released. This update introduced enhanced battle-related features and—most notably—direct import of VRM format models.
https://twitter.com/RPGBakin/status/1869196929915085228
For many people, myself included, the headline feature was the direct VRM import (though the battle improvements are certainly welcome too).
VRM format models refers to files exported from a 3D character creation application called “VRoid Studio” (VRM files).
While Bakin is primarily an HD-2D game development tool, it can also work with general 3D models.
Previously, importing a VRoid Studio model into Bakin required converting the VRM file to a compatible format through software like Blender.
With this update, that conversion is no longer necessary—you can now import 3D models directly from VRoid Studio into Bakin.
This article explains how to import and use a VRoid Studio model in Bakin.
What Is VRoid Studio?
Many readers here likely already know what VRoid Studio is, but for those who don’t, here’s a quick overview.
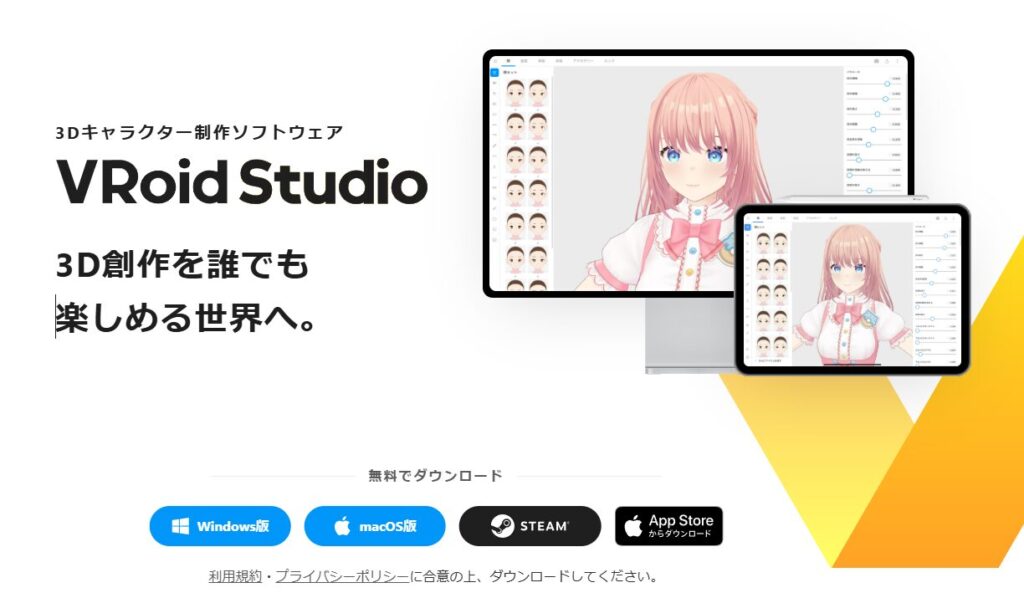
In short, “VRoid Studio” is free software that lets you easily create original 3D characters that can be animated and used in various applications.
It’s developed by Pixiv Inc., the company behind the illustration sharing platform “pixiv.”
Most 3D software has complex controls, and creating an original animated 3D character typically requires advanced knowledge.
VRoid Studio, however, requires no specialized knowledge and is free for general use.
Of course, once you get into it, you can do complex modeling or purchase premium assets from BOOTH—but that’s something to explore once you’re comfortable.
Many VTubers (Virtual YouTubers), which have been trending recently, also create their 3D character models using VRoid Studio.
The 3D characters created in VRoid Studio are called “VRoids,” and the file format used to export a VRoid for use in other applications is the “VRM format.”
Exporting a VRM File
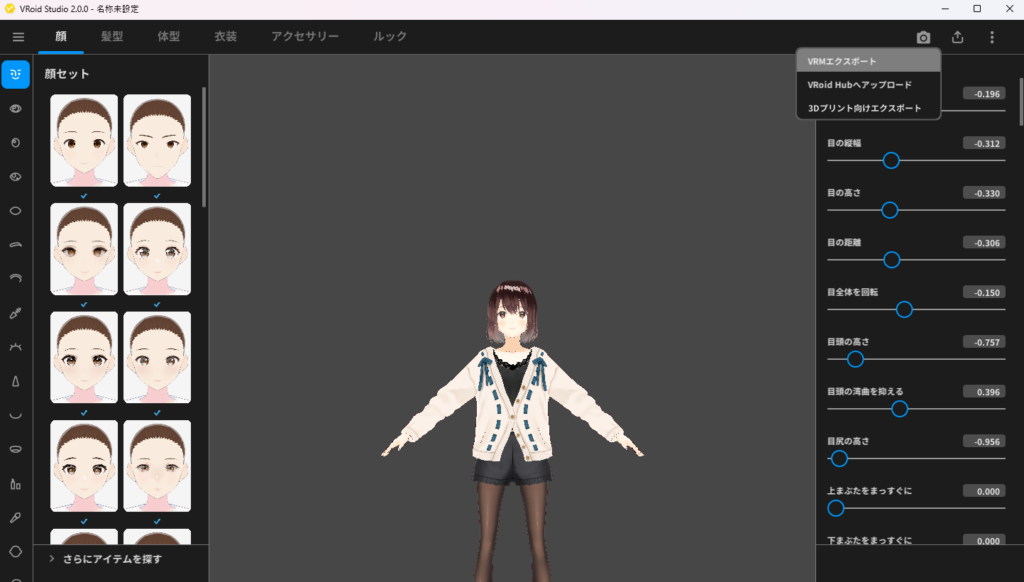
Let’s go ahead and export a VRM file from VRoid Studio. Download and install VRoid Studio from the official site.
The process is straightforward, but if you run into any issues, check a guide online. Once VRoid Studio is launched, you should see a screen like this.
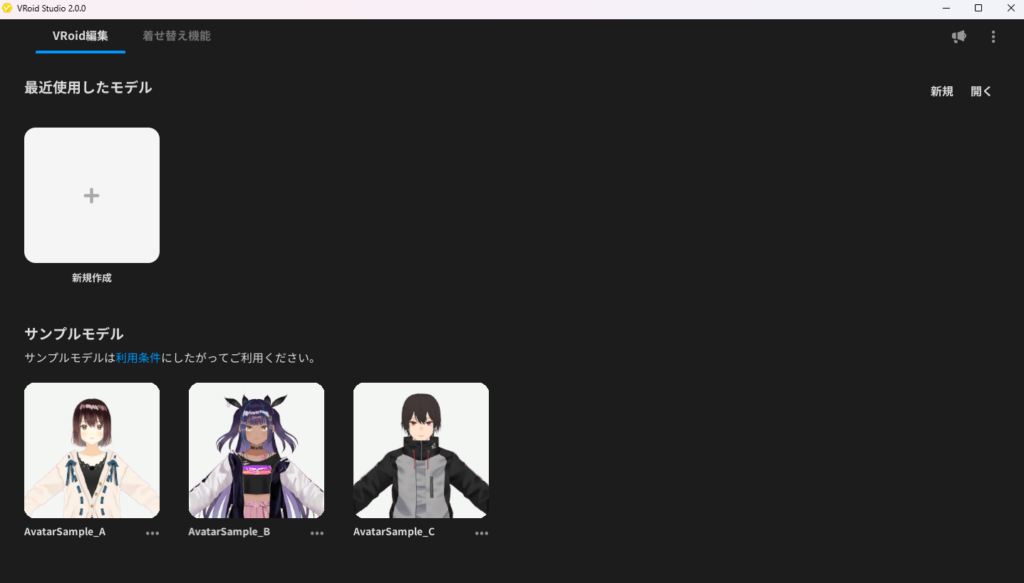
Ideally you would click “New Creation” to make your own original 3D character and export it in VRM format, but for this walkthrough I’ll use one of the sample models.
The sample models are quite high quality, and their terms of use allow modification, distribution, and commercial use—the only restriction is that copyright is not waived.
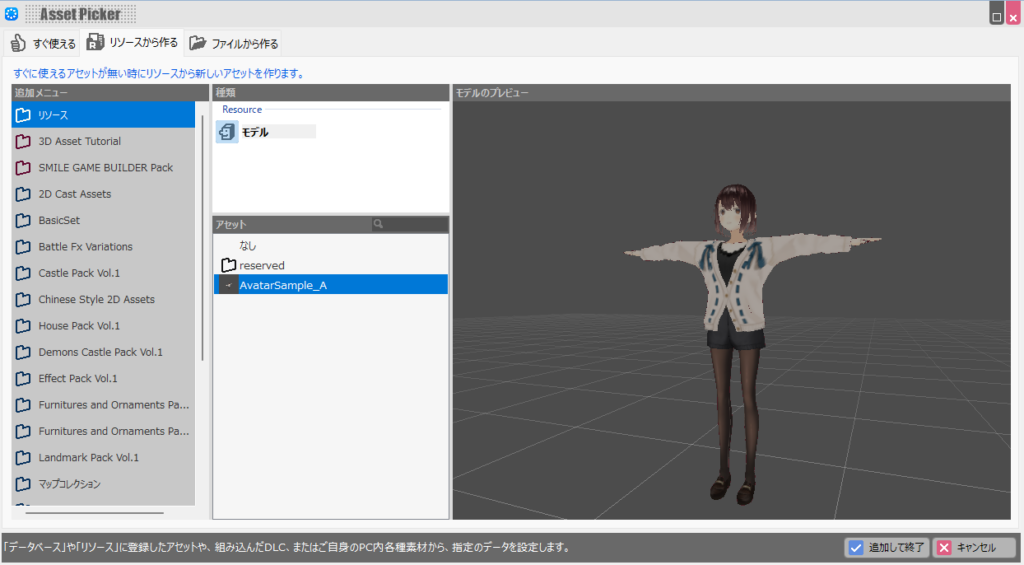
Select “AvatarSample A” in VRoid Studio. The editing screen for AvatarSample A will appear.
If you’re using a sample model for the first time, you’ll need to download it first—just click the download icon shown on screen.
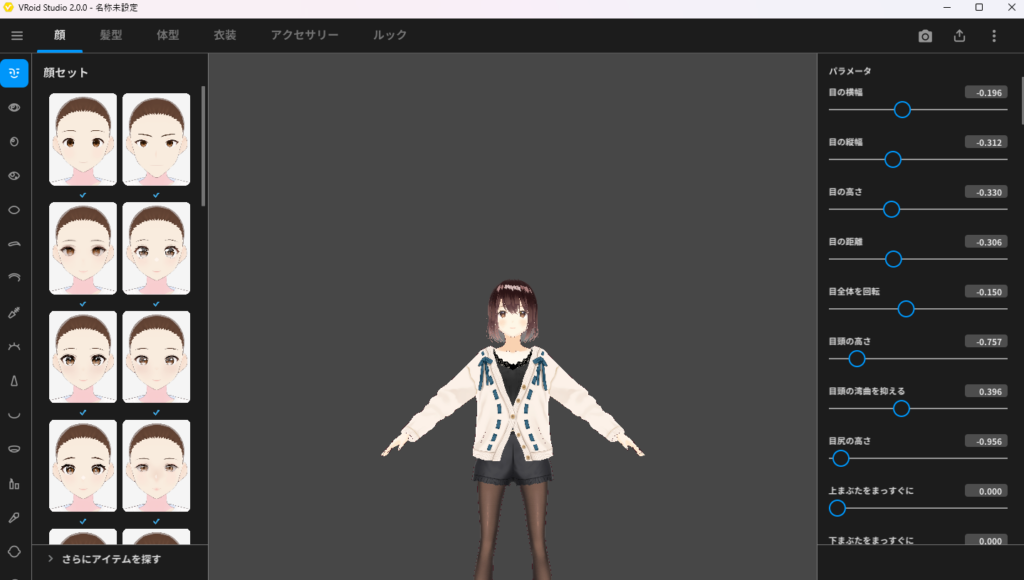
When creating an original 3D character, this is the screen where you freely modify its appearance.
Note that saving a character from this editing screen creates a “VRoid format file,” while exporting it for external use produces a “VRM format file”—two distinct file formats.
For this walkthrough I’ll use the model as-is, so click the arrow icon in the top-right of VRoid Studio and select “VRM Export” from the options that appear.
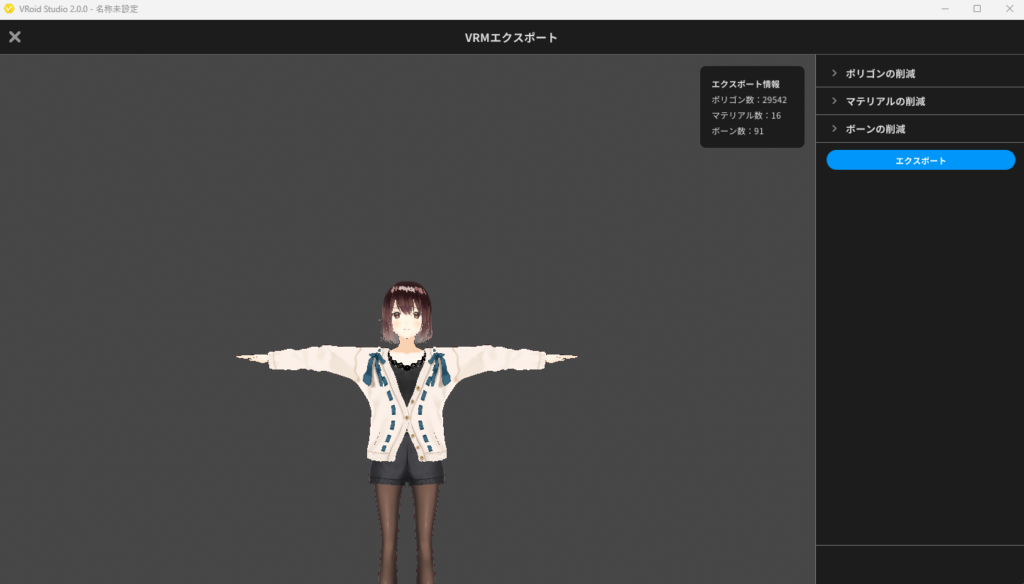
The VRM Export screen will appear. This screen lets you reduce the polygon count, material count, and other attributes of the 3D character before exporting.
You can adjust these to match the requirements of the target application, but for Bakin just click “Export” without making any changes.
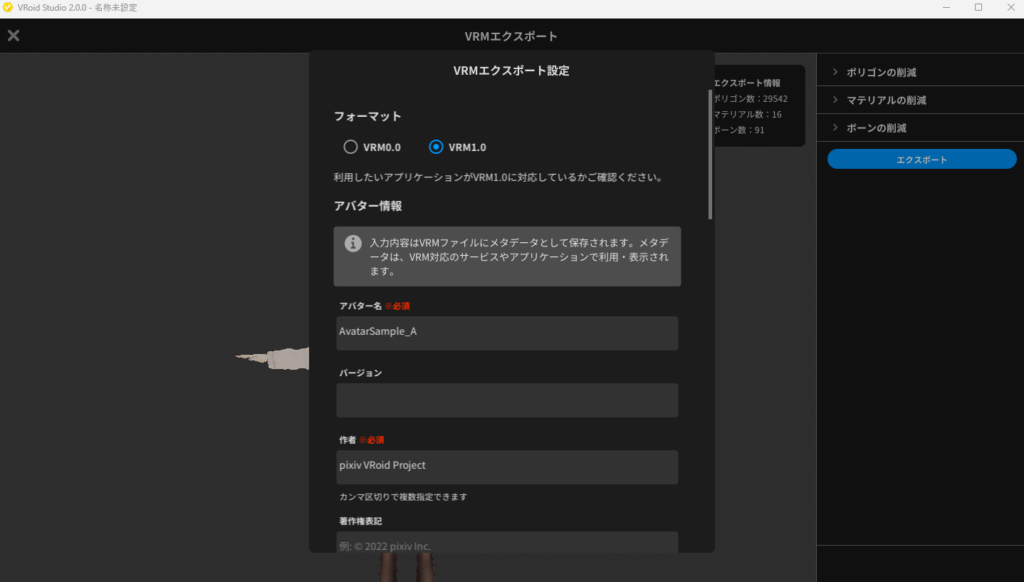
Clicking “Export” brings up the VRM export settings screen. At the top, there’s a field for choosing the VRM format version—select “VRM1.0” to be safe (VRM0.0 may also work).
You’ll need to enter a name (avatar name) and author for the exported 3D character. Since this is a sample model I’ll leave the defaults, but for an original character, enter your own avatar name and author name.
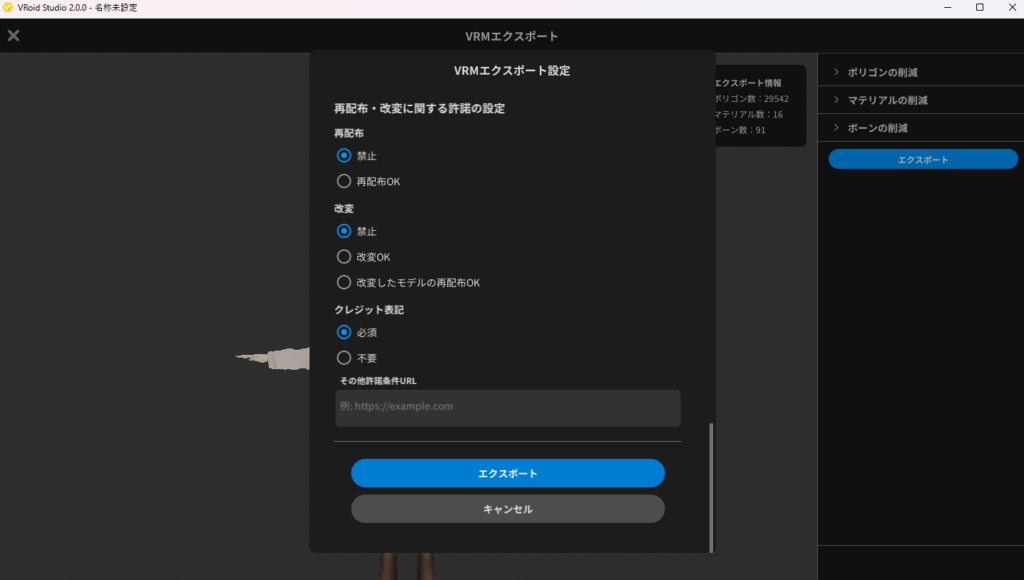
Scrolling down the settings screen reveals options for copyright and redistribution/modification settings. By default, the strictest settings apply (no one other than the creator may use it), so if you don’t plan to publish the character, leave these as-is.
Once you’ve reviewed everything, click “Export” at the bottom.
You’ll be prompted to choose a save location on your PC. Save it somewhere accessible, as you’ll need this file when importing into Bakin.
The VRM file is now exported to your local machine. Next, I’ll explain how to import this VRM file into Bakin.
Importing a VRM File into Bakin
Assuming you’re already familiar with Bakin’s basic operations from my other articles, here’s how to import a VRM file into an existing Bakin project.
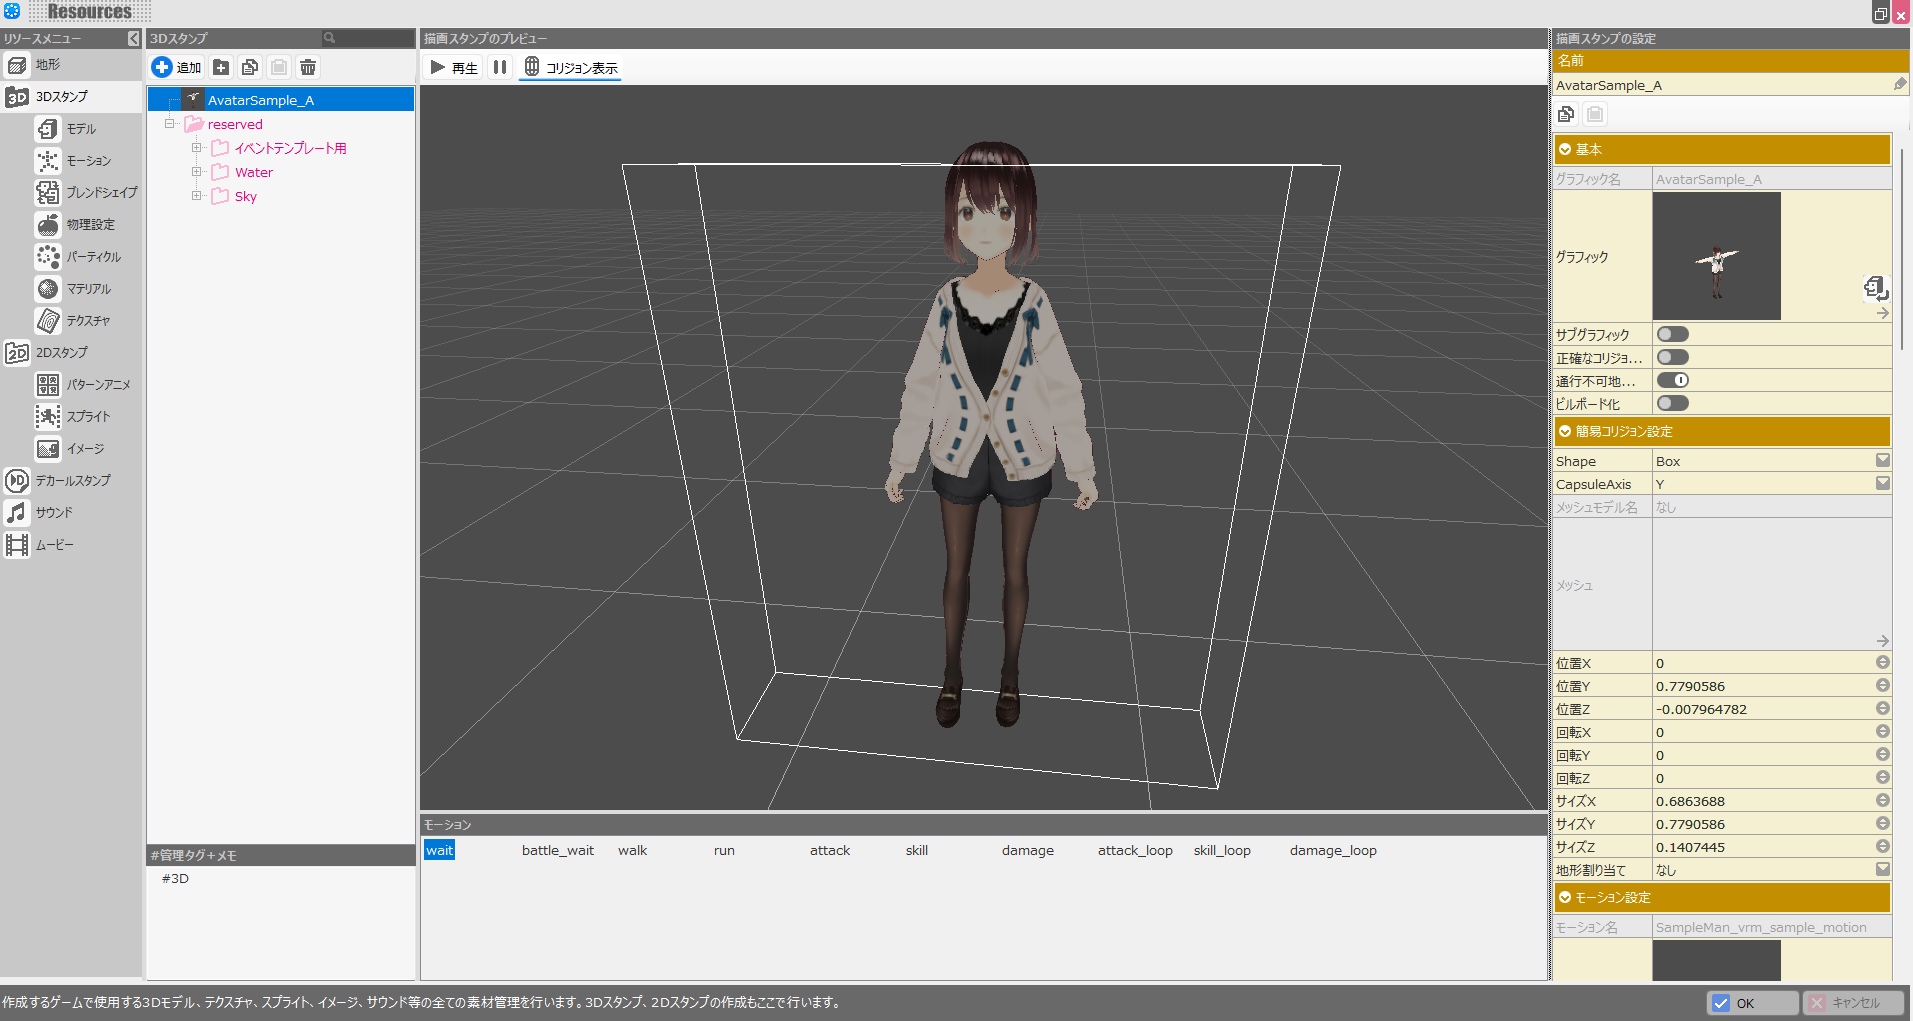
Open “Resources” from Bakin’s master menu and select “3D Stamps” from the resource menu.
Then click the “Add” button at the top center of the screen.
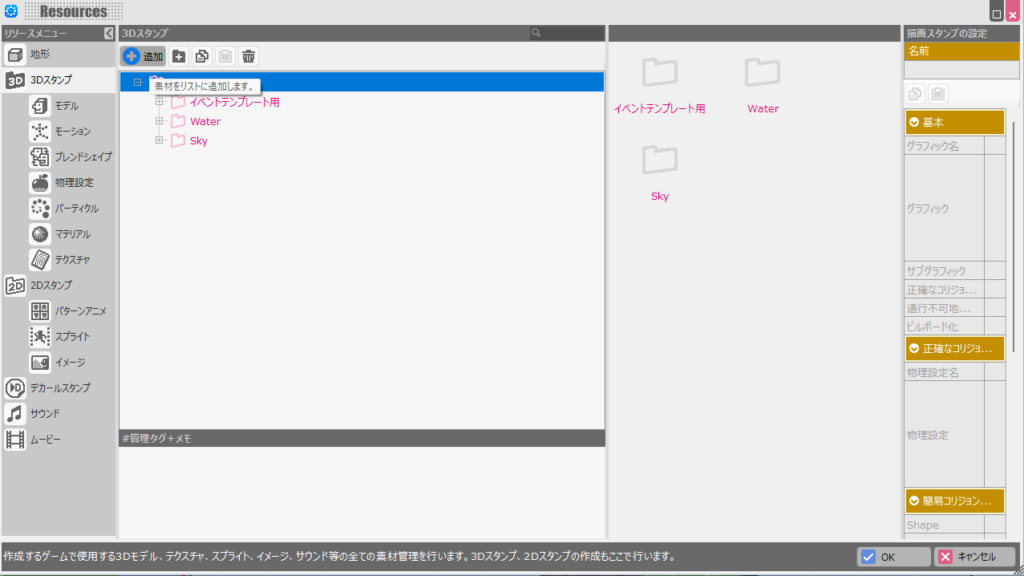
A file selection screen will appear. Select the VRM file exported from VRoid Studio and click “Add and Finish” in the lower right.

If the import is successful, an information popup will appear. Click “OK.”
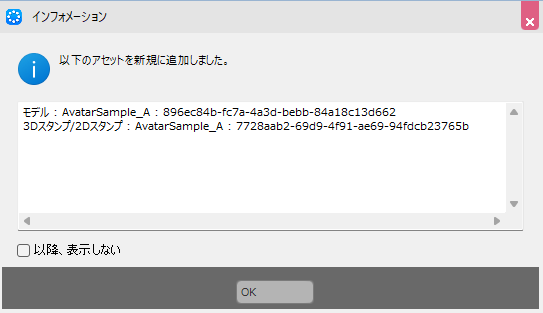
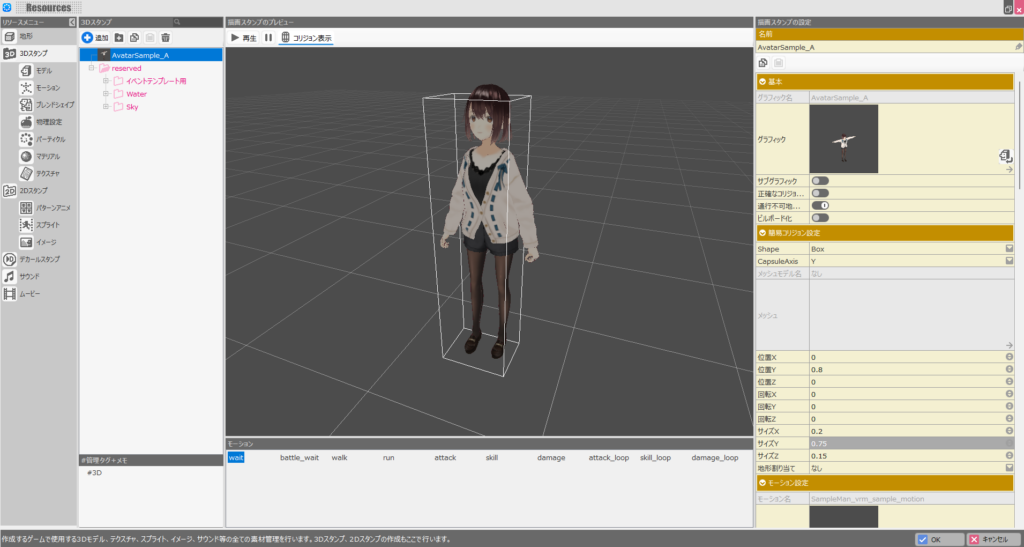
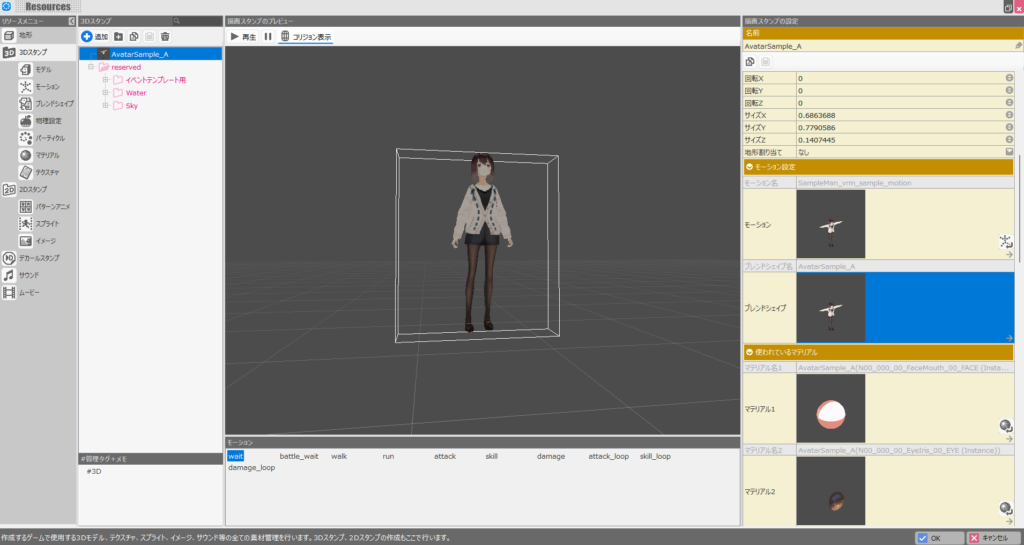
The 3D character created in VRoid Studio is now successfully imported as a 3D stamp in Bakin. The visual quality is quite good—it looks natural enough to fit right into a game.
A basic set of motions is also included by default (though they appear to be male-oriented motions).

While you’re here, set up the collision as well. On the right side of the 3D stamp screen, there’s a “Simple Collision Settings” section. Adjust the values to match the model, so the white rectangular outline approximately matches the character’s size.
“Collision” refers to the hit detection area in the game—the white rectangular outline is the actual hitbox applied in-game.
The default settings after import will make the collision noticeably larger than the character, which will look odd when you test it.
Adjust the collision to a natural size so the character feels right in-game. [Update 12/26] A Bakin update now automatically sets the collision to match the character on import. Unless you specifically want a smaller hitbox, no manual adjustment is needed.
Setting Up Blend Shapes in Bakin
Now that VRoid is imported into Bakin, the character can only display one expression at this stage.
Bakin includes a feature called “Blend Shapes” for creating facial expression variants for 3D characters, which you can use to add more expressions.
Scroll down the right-side panel on the 3D stamp screen until you see the “Blend Shape” settings section, then click the empty field there.
The blend shape setup screen will appear. Select “Create from Resource,” choose the 3D character model you just imported, and click “Add and Finish” in the lower right.
VRoid-created 3D characters actually come pre-configured with the data needed to create expression variants, so you can use the model directly.
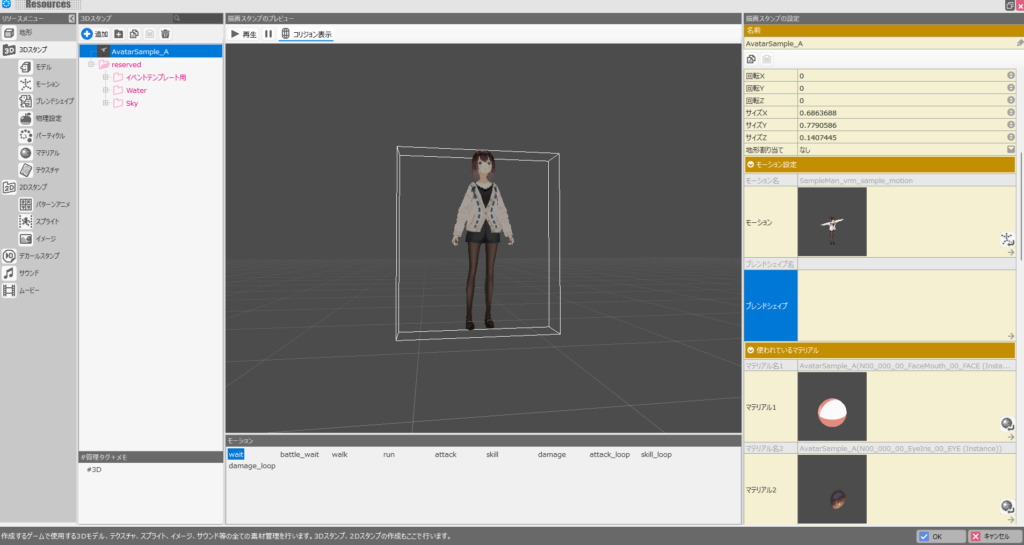
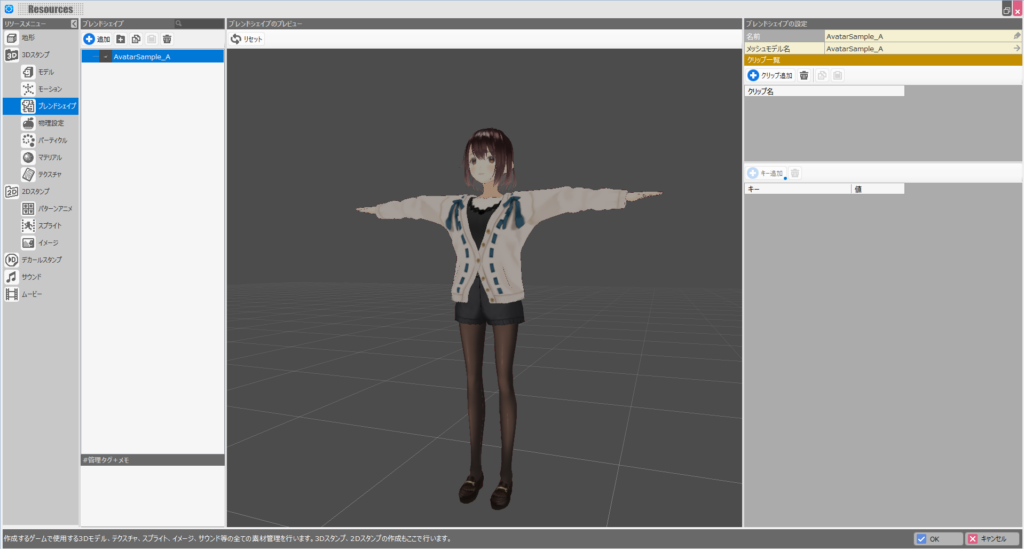
Once the blend shape is configured, the model’s image should now appear on the right side of the 3D stamp screen.
Next, in the left resource menu, switch the selection from “3D Stamps” to “Blend Shapes.” The blend shape you just configured should appear.
Selecting it reveals a “Clip List” section on the right side of the screen.
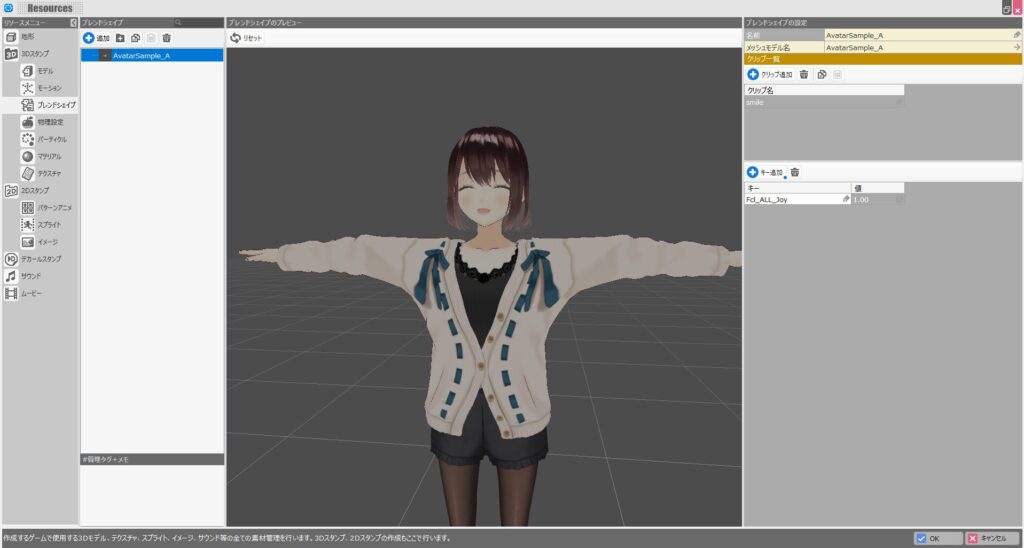
Click “Add Clip” in the “Clip List” to create a new clip. Name the clip “smile.”
With the “smile” clip selected, click “Add Key” below it. A large number of key elements for controlling expressions will appear.
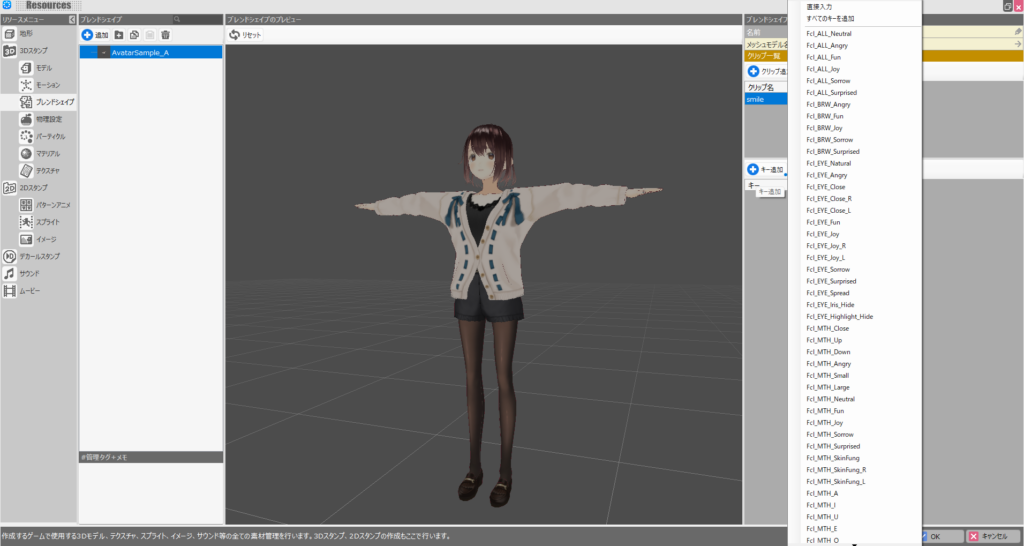
Try adding the key “Fcl_ALL_Joy” and setting its value to “1.00.” The 3D character in the preview window at the center should now be smiling.
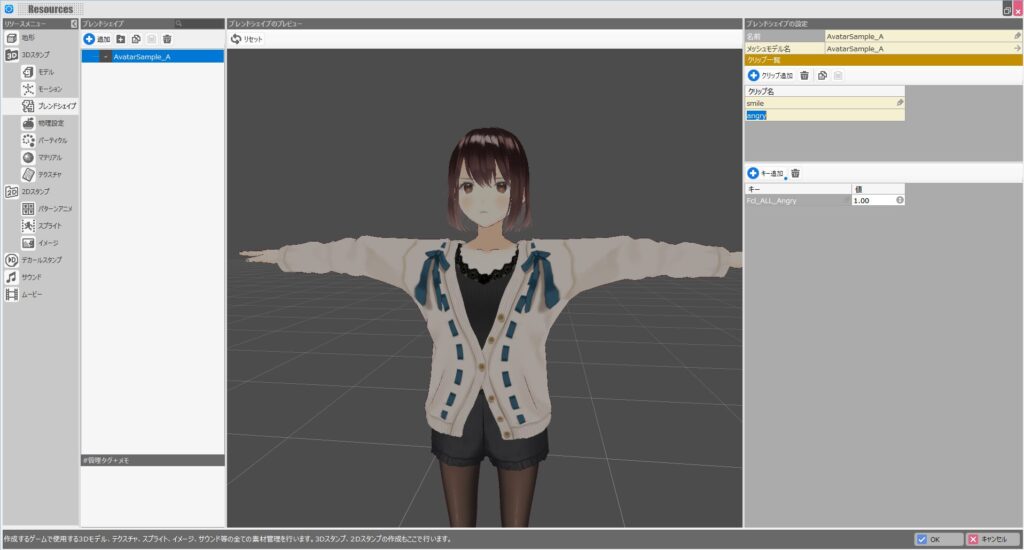
Next, try clicking “Add Clip” again to create a clip named “angry.” Add the key “Fcl_ALL_Angry” and set its value to “1.00.”
This setting should make the 3D character display an angry expression, as shown below.
Note: there is a current Bakin bug (it’s been there a long time, so it may be intended behavior) where switching between clips requires pressing the “Reset” button in the preview window each time, or the expression will display incorrectly.
This is likely because the expression values aren’t reset when switching clips—they just accumulate additively.
Blend shapes let you create expression variants like the smile and angry expressions we made here.
More specifically, a “clip” is one expression variant—you can create variants like “smile,” “angry,” and so on, each suited to a specific use.
The “key” elements within each clip define the components that make up the expression—the movement of the eyes, mouth, eyebrows, etc.
The “Fcl_ALL_XX” keys used here are convenience keys that set all expression elements (eyes, mouth, eyebrows) at once, but they don’t allow individual adjustments.
To change just the mouth expression, adjust “Fcl_MTH_XX” keys. For eye expressions, adjust “Fcl_EYE_XX” keys.
The “value” of a key controls the strength of its effect. A value of 0 means no effect; values closer to 1 have a stronger effect. So for a very angry expression, set the value close to 1. For slightly grumpy, use around 0.5.
The blend shapes set up here can be applied via dialogue scenes or event scripts.

In dialogue scenes, selecting the 3D stamp character we added allows you to apply both a “Motion” and a “Blend Shape” simultaneously.
Keep in mind, though, that facial expressions are often hard to see in Bakin’s default game view, so if you want expressions to be clearly visible, you may need to zoom in the camera at that moment.
Summary
In this article I covered how to import VRoid into Bakin (which became much easier with the update) and how to configure blend shapes (facial expression variants).
The ability to freely import VRoids made me think 3D character games might become a trend in Bakin—but realistically, there are still some limitations.
The main issue is that even after importing a VRoid, the available motions are too few to use the character as anything more than a background NPC.
Using the character meaningfully in a game requires adding motions, and to do that you’d still need to convert to FBX format via Blender or similar—at least that was my impression at the time. [Update 12/26] I’ve written a guide on adding motions, linked below.
No intermediate software like Blender is needed, so adding motions has become considerably easier. I’ll continue covering how to build games in Bakin going forward—check back if you’re interested.
📚 Series: RPG Maker Bakin: Game Development Guide (15/17)